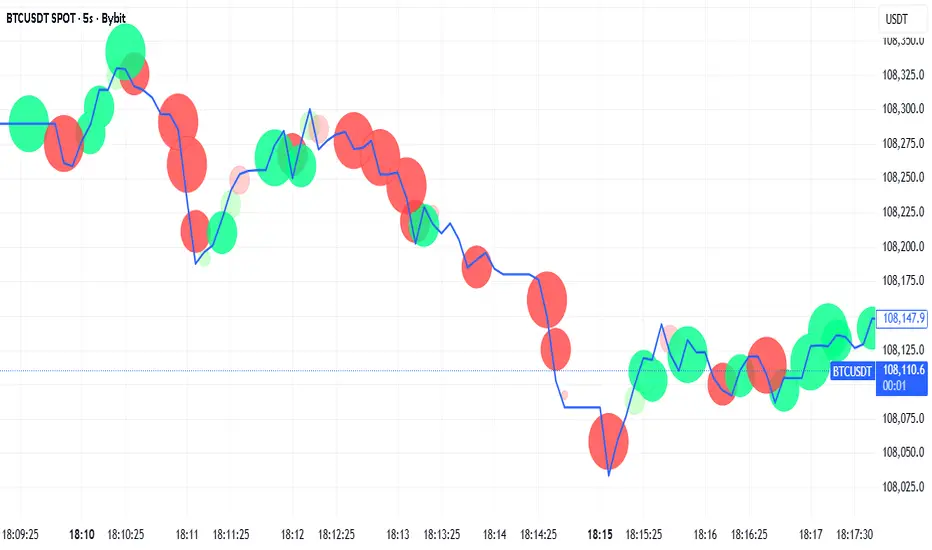
Volume Delta Profile BubblesVolume Delta Profile Bubbles
🔵 What is this indicator?
Volume Delta Profile Bubbles is a unique indicator that combines two powerful concepts — Volume Profile and Volume Delta — to identify price levels where the market has reacted with significant volume AND strong directional pressure.
Instead of showing a traditional vertical histogram on the price axis, this indicator stamps a bubble directly on the candle at the exact price level where the reaction occurred. The bigger the bubble, the more times that level has been confirmed over time.
🔵 How does it work?
For each candle, the indicator analyzes two independent events:
🟢 Green bubble on the LOW — The lower wick is significant, buy volume is concentrated on the low, and that price level has been visited multiple times with the same bullish pressure. This identifies zones where the market found strong buyers.
🔴 Red bubble on the HIGH — The upper wick is significant, sell volume is concentrated on the high, and that price level has been visited multiple times with the same bearish pressure. This identifies zones where the market found strong sellers.
A doji with long wicks on both sides can generate both a green bubble on the low and a red bubble on the high simultaneously — indicating a zone of strong contention from both sides.
Volume is normalized using standard deviation (volume / stdev(volume, period)), which automatically adjusts for session differences. This means the indicator works correctly across Regular Trading Hours (RTH) and Extended Trading Hours (ETH) — a high volume candle in ETH is compared against typical ETH volumes, not RTH volumes.
Bubble size reflects how many times that level has been confirmed:
🔵 Tiny → minimum confirmations
🔵 Small → 2x minimum confirmations
🔵 Normal → 3x minimum confirmations
🔵 Large → 4x minimum confirmations
🔵 Huge → 5x+ minimum confirmations
🔵 Parameters
Price Tolerance (points) — The radius around a price level within which candles are considered "at the same level". Adjust based on your instrument's tick size. For XAUUSD use 0.3–0.8, for indices use 1–2.
Volume Threshold (x std dev) — Minimum volume significance. At 1.0 many bubbles appear, at 2.0 only exceptional volume spikes trigger. Start at 1.5 and increase until bubbles visually align with clear market reactions.
Delta Min % of candle volume — Minimum percentage of volume that must be concentrated on the wick to qualify as directional pressure. Lower to 15% for more signals, raise to 30%+ for high selectivity.
Min Wick % of range — Minimum wick size relative to the total candle range. At 0.20 the wick must be at least 20% of the range. Raise to 0.30–0.40 to filter only candles with clear rejections.
Min Confirmations — How many times the level must have been visited with the same characteristics before drawing a bubble. At 2 it is already selective. Raise to 3–4 to see only the most robust support/resistance levels.
Lookback bars — How many bars back to calculate the Volume Profile. On low timeframes (1–5 min) use 200–300 to cover the current session. On higher timeframes (1H–4H) you can go up to 500.
Normalization Period — The period for standard deviation calculation of volume. Default 200 is solid for most use cases.
Transparency — Alpha of the bubbles. Since bubbles can overlap on the same level, lower transparency creates a natural gradient effect — overlapping bubbles become more visible.
Alert Size — Minimum bubble size that triggers an alert. Set via dropdown: tiny / small / normal / large / huge.
🔵 Suggested Setups
Breakout Setup (Bullish)
When a medium-to-large green bubble forms and price subsequently closes above the bubble level, the market has absorbed all the selling pressure and buyers are in control. This often leads to an impulsive extension to the upside. Enter on the breakout candle or on a retest of the level.
Liquidation Cascade Setup (Bearish)
When price closes below a green bubble level with bearish bias, the long positions that accumulated at that level are being stopped out. Their stop losses become sell orders, adding further downward pressure. This often triggers a sharp bearish extension.
The same logic applies in reverse for red bubbles — closes above a red bubble can trigger short squeeze extensions, closes below often lead to continuation.
Confluence Setup
A level with both a green and red bubble (visible on doji candles) is a zone of strong contention. When price returns to these levels, expect explosive moves in either direction. Wait for a clear directional close before committing.
Size Matters
Always prioritize large and huge bubbles — these represent levels tested and confirmed multiple times with significant volume. A huge green bubble on the low is a much stronger potential support than a tiny one.
🔵 Important Notes on Volume Data
⚠️ This indicator requires real volume data to function correctly. It will not work properly on instruments that do not provide actual traded volume.
✅ Works well on: Futures (ES, NQ, GC, CL), Crypto (BTC, ETH), Forex pairs on brokers that provide tick volume.
⚠️ Use with caution on: CFDs and some Forex pairs where volume data may represent tick count rather than actual traded volume. Results may be less reliable.
❌ Not suitable for: Instruments with no volume data at all.
The Volume Delta calculation in this indicator is an approximation — without real tick-by-tick data, buy and sell volume are estimated based on wick proportions. On instruments with real volume data (futures, crypto), the approximation is reasonably accurate. On tick-volume instruments, treat the signals as directional bias indicators rather than precise measurements.
🔵 Call to Action
If you find this indicator useful, please leave a comment sharing how you are using it and on which instruments. Your feedback helps improve future versions.
🚀 Boost the script if you want to support the development of more tools like this one.
📬 For questions, suggestions or bug reports, use the comment section below.
⚠️ Disclaimer
This indicator is for educational and informational purposes only. It does not constitute financial advice, investment advice, or a recommendation to buy or sell any financial instrument. Past performance of any level identified by this indicator does not guarantee future results. Always use proper risk management and consult a qualified financial advisor before making any trading decisions. Trading involves substantial risk of loss.
Chỉ báo Pine Script®