NQ Session High-Low + Buy Sell Signalsbuy sell signals with session high low .. it will give you more confirmation when to enter or exit with keeping your loss at minimum and making more profitsChỉ báo Pine Script®của balwindermavi4
Gold Breakout Trader⚙️ Gold short-term entries off M1 timeframe every 2 hours every day with SL/TP targets. 📦 2-Hour Breakout Structure: The indicator plots a new set of dynamic zones every two hours, providing a fresh breakout structure based on the most recent price action. This is the default setting and is designed for intraday trading. 🎯 Precision Entry & Exit Levels: A central gray box is plotted, with Buy Stop and Sell Stop lines automatically placed 2 USD away from its borders. This buffer creates a neutral zone and helps filter out noise. 💰 Pre-Defined Profit Targets: Three Take Profit TP zones are plotted for both long and short trades TP1, TP2, TP3. These zones are spaced apart, providing clear targets for managing trades. ⚙️ Fully Customizable Spacing: Every element is adjustable. You can change the buffer between the gray box and stop lines, the gap between the stop lines and the first TP zone, and the gaps between each subsequent TP zone. 🔔 M1 Breakout Alerts: The indicator includes a powerful alerts module that triggers when an M1 candle closes above the Buy Stop level or below the Sell Stop level. This provides real-time notifications for potential trade entries. 🎨 Clean Visuals & Clear Labels: The zones are color-coded teal for buy-side, red/purple for sell-side for instant recognition. The Buy Stop and Sell Stop labels are also colored to match their respective directions, ensuring zero confusion. ⚙️ Trading Strategy & Logic This strategy is designed for precision and requires patience. The core idea is to wait for the market to confirm a breakout of the established 2-hour range before entering a trade. 📌 Entry Logic 1. 🕒 Wait for a New Zone: Allow the indicator to plot a new 2-hour structure. Do not trade old or expired zones. 2. 🔔 Set Your Alerts: In TradingView, create a new alert and select the indicator. For the condition, choose "Any alert() function call" and set it to trigger "Once Per Bar Close". This will notify you the moment a candle closes across a stop level. 3. 👀 Wait for the M1 Close: For a Long Buy Trade, wait for an M1 candle to close above the Buy Stop line. For a Short Sell Trade, wait for an M1 candle to close below the Sell Stop line. 4. ✅ Enter on Confirmation: Once you receive the alert and visually confirm the M1 candle has closed past the level, you can enter the trade. 🛑 Stop Loss SL Placement The stop loss is designed to be tight and objective, providing a clear invalidation of the trade idea. ⬇️ For a Long Trade, the Stop Loss should be placed at the Sell Stop line the level on the opposite side of the gray box. ⬆️ For a Short Trade, the Stop Loss should be placed at the Buy Stop line. 🎯 Take Profit TP Strategy The indicator provides three clear targets. How you use them depends on your trade management style. 🥇 TP1: The first level of resistance/support. This is an ideal target for taking partial profits and moving your stop loss to breakeven. 🥈 TP2 & TP3: Subsequent targets for scaling out of the position or for your final profit target. ⚠️ IMPORTANT NOTICE This indicator and the accompanying strategy are provided for educational purposes only. Trading financial markets involves substantial risk, and past performance is not indicative of future results. The logic described is based on a specific set of rules and does not guarantee profit. Always conduct your own analysis and risk management before entering any trade. The creators are not responsible for any financial losses incurred. Chỉ báo Pine Script®của ProjectSyndicate1414701
Adaptive Buy Sell Signal [AvantCoin] A comprehensive customized indicator for different markets 🔴Before you start🔴: Please note that this tool is designed to assist you in analyzing the market, and NOT to make buy/sell decisions for you. You should combine its data with your own strategies and indicators before making any trading choices ==================== Market-Specific Optimizations Auto-Detection (or Manual Selection) It automatically detects which market you're trading: Forex (EUR/USD, GBP/USD, etc.) Stocks (AAPL, TSLA, etc.) Indices (NAS100, SPX, etc.) Commodities (Gold, Silver, Oil) Crypto (BTC, ETH, etc.) avantcoin.com Forex-Specific Features: ✅ Session Filters: Avoids low-liquidity Asian session ✅ Session backgrounds: Green for London/NY overlap (best trading time) ✅ Tighter ADX threshold (20) - good for Forex trends ✅ Lower volatility filter - skips dead zones ⚙️ Min Confluence: 5 (balanced) ⚙️ Cooldown: 5 bars ⚙️ Volume threshold: 1.3x (Forex has consistent volume) avantcoin.com Stocks-Specific Features: ✅ Market hours filter: Only signals during NYSE hours. ✅ Gap detection: Avoids trading immediately after large gaps up/down ✅ Higher ADX threshold (22) - Stocks trend differently ✅ Stricter volume requirement (1.5x) - Stocks vary more ⚙️ Min Confluence: 6 (higher quality) ⚙️ Cooldown: 3 bars (stocks move faster) Indices (Nasdaq, S&P; 500): ✅ Similar to stocks but slightly more lenient ✅ Lower ADX (18) - Indices are smoother ⚙️ Min Confluence: 5 ⚙️ Cooldown: 4 bars Commodities (Gold, Silver, Oil): ✅ Highest ADX requirement (23) - Only trade strong trends ✅ Higher volatility filter (1.6x) - Commodities can be wild ⚙️ Min Confluence: 6 ⚙️ Cooldown: 6 bars (avoid whipsaws) Crypto: ✅ 24/7 trading (no session restrictions) ✅ Lower ADX (15) - Crypto is always volatile ✅ Much higher volume threshold (2.0x) - Crypto volume spikes ⚙️ Min Confluence: 4 (crypto moves fast) ⚙️ Cooldown: 3 bars 📊 Visual Enhancements: Market Type Badge at top of table (Forex, Stocks, etc.) Session Status: Forex: Shows 🟢 LDN/NY, 🔵 London, 🟠 NY, 🔴 Asian Stocks: Shows 🟢 Open or 🔴 Closed Session Background Colors on chart (optional) Current Settings Display: Shows your Min score, ADX threshold, Cooldown ⚙️ How to Use: For Forex: Enable "Avoid Asian Session" Best signals during London/NY overlap For Stocks: Enable "Trade Stock Hours Only" Watch for gap warnings avantcoin.comChỉ báo Pine Script®của AvantCoin365
EMA Buy/Sell & Smart Zones(5Min TF only)### **Indicator Title:** **EMA Buy/Sell & Smart Zones** --- ### **Description:** **EMA Buy/Sell & Smart Zones** is a specialized intraday trading tool designed to combine trend analysis with precise market structure zones. This script utilizes a custom tracking algorithm to identify the **specific candle** that formed the previous session's high or low, allowing it to plot accurate Supply and Demand zones for the current trading day. This indicator has been rigorously tested on the **Nifty Index** and is optimized for use on the **5-minute timeframe**. ### **Key Features** **1. Smart Session Wick Zones ("True Wick" Logic)** The indicator automatically scans every candle of the previous session to locate the exact price action that formed the day's extremes. * **Smart High Zone:** Identifies the specific candle that made yesterday's High and plots a zone from that High down to that candle's Open or Close (based on body direction). * **Smart Low Zone:** Identifies the specific candle that made yesterday's Low and plots a zone from that Low up to that candle's Open or Close. * **Close Range:** Highlights the High-Low range of the very last candle of the previous session to show the closing sentiment. *All zones automatically stop extending at the end of the current session, ensuring the chart remains clean and historically accurate.* **2. EMA Trend System** The script plots three key Exponential Moving Averages to define market direction: * **EMA 21:** Captures short-term momentum. * **EMA 63:** Defines the medium-term trend. * **EMA 1575:** Establishes the long-term baseline. **3. Buy/Sell Signals** Clear signals are generated on the chart based on specific criteria: * **BUY Signal:** Generated when a green candle closes above the EMA 21 and EMA 63. * **SELL Signal:** Generated when a red candle closes below the EMA 21 and EMA 63. * *Note: The logic includes a filter to alternate signals (Buy -> Sell -> Buy), preventing clutter during choppy markets.* ### **How to Use** * **Recommended Timeframe:** **5 Minutes**. * **Recommended Markets:** Indices (Nifty, Bank Nifty) and high-volume stocks. * **Workflow:** * Use the **Smart Zones** (Red/Green boxes) to identify potential rejection areas or breakout targets. * Use the **Buy/Sell Labels** as confirmation triggers when price is reacting near these zones or trending strongly above/below the EMAs. ### **Settings & Customization** * **Visibility Control:** Toggle each box type (High, Low, Close) and text labels on or off individually. * **Color Customization:** Fully adjustable colors for all EMAs, Zone Backgrounds, Borders, and Text Labels to suit your chart theme. * **Label Size:** Adjust the text size of the zone labels directly from the settings menu. --- **Disclaimer:** This tool is for educational purposes and should be used to assist your analysis. Always manage your risk appropriately.Chỉ báo Pine Script®của chaitu50cCập nhật 203
Winners Scalper Pro - Bull/Bear (v1.5)best settings all standart but only change rsi 15 min rsi 8-9 30 min rsi 12-14 Chỉ báo Pine Script®của sabritonyaliCập nhật 11259
MidZone Breakout Pro 🚀 MidZone Breakout Pro — Smart Balance Zone Signals 🧭 Equilibrium-Based Market Insight MidZone Breakout Pro identifies key balance levels in the market and highlights directional opportunities when price decisively moves away from equilibrium. 📐 Dynamic Midpoint Zone Mapping Automatically plots a central price balance zone derived from recent market ranges, helping traders visualize fair value and expansion areas. 🎯 Clear Buy & Sell Signals Generates clean bullish and bearish signals when price exits the balance zone with momentum. 🎨 High-Visibility Zone Visualization Color-coded zones, background shading, and bold signal markers provide instant clarity without chart clutter. 🎚 Customizable Sensitivity Adjustable lookback period and zone width allow seamless adaptation across scalping, intraday, and swing trading. 🕰 Non-Repainting Signals All signals are calculated using confirmed price action and remain stable on historical charts. ⚡ Lightweight & Fast Performance Optimized design ensures smooth performance across all instruments and timeframes. 🛠 How to Use (Safe Version) 📉 **Buy Signal**: Appears when price moves strongly above the balance zone 📈 **Sell Signal**: Appears when price moves strongly below the balance zone 🟨 **Neutral Zone**: Indicates consolidation or equilibrium conditions Best used in combination with trend direction, support/resistance, or volume confirmation. ⚠️ Disclaimer: This indicator is for educational and analytical purposes only. It does not provide financial advice. Always apply proper risk management. Chỉ báo Pine Script®của ChandraBose200244832
Volume Anomaly Reversal DetectionVolume Anomaly Reversal Detection (VARD System) 🎯 What This Indicator Does This indicator identifies potential trend reversals by detecting abnormal volume activity that often precedes significant price movements. It combines volume anomaly detection with dynamic trend analysis to generate actionable BUY/SELL signals. 📊 Core Concept & Methodology Volume Anomaly Detection The indicator analyzes directional volume (buying vs selling pressure) from a lower timeframe and calculates Z-scores to identify statistically significant volume spikes. Z-Score Formula: Z = (Current Volume - Average Volume) / Standard Deviation When volume exceeds the threshold (default: 3 standard deviations above mean), it signals unusual market activity - often caused by forced liquidations or capitulation. Dynamic Trend Filter A custom trend-following algorithm based on ATR (Average True Range) bands determines the current market direction: Price above lower band = Uptrend Price below upper band = Downtrend Signal Logic Volume anomaly detected during an existing trend Trend reversal confirmed within the confirmation window Signal generated = BUY or SELL label appears ⚙️ Settings Explained SettingDefaultDescriptionAnalysis Timeframe15minLower timeframe for volume samplingStatistical Lookback200Bars used for Z-score calculationAnomaly Sensitivity3.0Z-score threshold (lower = more signals)Confirmation Window50Max bars between anomaly and trend flipATR Multiplier2.0Trend band widthTrend Period10ATR calculation length 📖 How To Use Entry Signals BUY: Green label appears below bar - consider long positions SELL: Red label appears above bar - consider short positions Volume Anomaly Markers (⬥) Small diamonds indicate detected volume spikes These are early warnings before confirmed signals Useful for anticipating potential reversals Trend Bands Colored zones show active signal direction Stay with the trend until opposite signal appears Best Practices Confirm with price action - Look for support/resistance levels Use appropriate timeframes - Works on all timeframes, but 1H-4H recommended Manage risk - Always use stop losses Avoid ranging markets - Best in trending/volatile conditions ⚠️ Important Notes No indicator is perfect - Use as part of a complete trading strategy Volume data required - Will show warning if volume unavailable Not financial advice - Always do your own research 🔔 Alerts Available BUY Signal Confirmed SELL Signal Confirmed Volume Anomaly (Buy Setup) Volume Anomaly (Sell Setup)Chỉ báo Pine Script®của A1TradingHubCập nhật 66 1.2 K
Next Candle PredictorAdvanced TradingView Indicator for Precise Buy and Sell Signals Overview: The Predicta Futures - Next Candle Predictor is a cutting-edge TradingView indicator designed to forecast the next candle's direction in futures and cryptocurrency markets. Leveraging a multi-indicator confluence strategy, this tool provides traders with actionable long and short prediction percentages, enhanced by dynamic ADX-based thresholds and visual projection candles. Ideal for scalping, day trading, or swing trading on platforms like MEXC or Binance futures, it combines Supertrend, MACD, RSI, Stochastic, ADX, and volume analysis to deliver high-probability buy and sell signals while minimizing false positives. Key Features: • Multi-Indicator Confluence Scoring: Integrates Supertrend for trend direction, EMAs (8, 21, 50) for alignment, MACD for momentum crossovers, RSI for overbought/oversold conditions, Stochastic for divergence detection, ADX for trend strength, and volume ratios for confirmation. A customizable confluence score (0-6) ensures signals meet user-defined criteria, reducing whipsaws in volatile markets. • Dynamic Prediction Thresholds: ADX-driven adjustments lower the required prediction percentage (e.g., 60% in strong trends) for "PERFECT TIME" entries, adapting to market conditions like ranging or trending phases. • Visual Analysis Table: A sleek, color-coded dashboard displays progress bars for each indicator, prediction percentages, and status (e.g., "PERFECT TIME" or "WAIT"). Supports long and short analyses with intuitive ASCII bars for quick scans. • Projection Candles: Simulates potential next-candle outcomes with volatility-scaled (via Bollinger Bands width) green long and red short candles, aiding in visualizing price targets. • Buy/Sell Signals and Alerts: Generates labeled "BUY" and "SELL" arrows on EMA crossovers within confirmed trends, with separate alerts for basic signals and high-confluence "PERFECT TIME" opportunities. • Customizable Inputs: Adjust ATR periods, Supertrend factors, minimum confluence scores, and volume ratios to tailor the indicator for stocks, forex, or crypto perpetual futures. How It Works: This TradingView script calculates long and short scores using weighted contributions from key indicators, normalizing them into prediction percentages. A confluence check—factoring trend, EMA alignment, MACD, Stochastic, volume, and ADX—triggers "PERFECT TIME" only when conditions align robustly. For example: • In a downtrend (Supertrend red), with bearish MACD and Stochastic, and sufficient volume, the indicator highlights short opportunities. • Dynamic thresholds ensure aggressive entries in strong trends (ADX >25) and conservative ones in weak trends. • Backtested for reliability, it excels in identifying reversals and continuations, making it a must-have for traders seeking an edge in futures trading strategies. Usage Instructions: 1. Add the indicator to your TradingView chart. (Search: Next Candle Predictor) 2. Customize settings via the inputs panel (e.g., set minConfluence to 5 for stricter signals). 3. Monitor the analysis table for predictions and confluence scores. 4. Act on "BUY/SELL" labels or "PERFECT TIME" alerts, combining with your risk management. 5. Enable projection candles for visual forecasting of the next bar. Compatible with all timeframes, from 1-minute scalping to daily swings. Note: This is not financial advice; always verify signals with additional analysis. Join thousands of traders enhancing their strategies—add it to your charts today and elevate your trading performance! Please rate and review if it boosts your trades! Thank you!Chỉ báo Pine Script®của PredictaFuturesCập nhật 3838 4.8 K
Next Candle PredictorAdvanced TradingView Indicator for Precise Buy and Sell Signals Overview: The Predicta Futures - Next Candle Predictor is a cutting-edge TradingView indicator designed to forecast the next candle's direction in futures and cryptocurrency markets. Leveraging a multi-indicator confluence strategy, this tool provides traders with actionable long and short prediction percentages, enhanced by dynamic ADX-based thresholds and visual projection candles. Ideal for scalping, day trading, or swing trading on platforms like MEXC or Binance futures, it combines Supertrend, MACD, RSI, Stochastic, ADX, and volume analysis to deliver high-probability buy and sell signals while minimizing false positives. Key Features: * Multi-Indicator Confluence Scoring: Integrates Supertrend for trend direction, EMAs (8, 21, 50) for alignment, MACD for momentum crossovers, RSI for overbought/oversold conditions, Stochastic for divergence detection, ADX for trend strength, and volume ratios for confirmation. A customizable confluence score (0-6) ensures signals meet user-defined criteria, reducing whipsaws in volatile markets. * Dynamic Prediction Thresholds: ADX-driven adjustments lower the required prediction percentage (e.g., 60% in strong trends) for "PERFECT TIME" entries, adapting to market conditions like ranging or trending phases. * Visual Analysis Table: A sleek, color-coded dashboard displays progress bars for each indicator, prediction percentages, and status (e.g., "PERFECT TIME" or "WAIT"). Supports long and short analyses with intuitive ASCII bars for quick scans. * Projection Candles: Simulates potential next-candle outcomes with volatility-scaled (via Bollinger Bands width) green long and red short candles, aiding in visualizing price targets. Buy/Sell Signals and Alerts: Generates labeled "BUY" and "SELL" arrows on EMA crossovers within confirmed trends, with separate alerts for basic signals and high-confluence "PERFECT TIME" opportunities. * Customizable Inputs: Adjust ATR periods, Supertrend factors, minimum confluence scores, and volume ratios to tailor the indicator for stocks, forex, or crypto perpetual futures. How It Works: This TradingView script calculates long and short scores using weighted contributions from key indicators, normalizing them into prediction percentages. A confluence check—factoring trend, EMA alignment, MACD, Stochastic, volume, and ADX—triggers "PERFECT TIME" only when conditions align robustly. For example: In a downtrend (Supertrend red), with bearish MACD and Stochastic, and sufficient volume, the indicator highlights short opportunities. Dynamic thresholds ensure aggressive entries in strong trends (ADX >25) and conservative ones in weak trends. Backtested for reliability, it excels in identifying reversals and continuations, making it a must-have for traders seeking an edge in futures trading strategies. Usage Instructions: 1. Add the indicator to your TradingView chart. 2. Customize settings via the inputs panel (e.g., set minConfluence to 5 for stricter signals). 3. Monitor the analysis table for predictions and confluence scores. 4. Act on "BUY/SELL" labels or "PERFECT TIME" alerts, combining with your risk management. 5. Enable projection candles for visual forecasting of the next bar. Compatible with all timeframes, from 1-minute scalping to daily swings. Note: This is not financial advice; always verify signals with additional analysis. Rate and review if it boosts your trades! Thank you!Chỉ báo Pine Script®của PredictaFuturesCập nhật 348
Buy the dips StrategyThis strategy getting in long position only after the price drop- Buy the dips The % of the drop is Determined by SMA for the first trade The inputs of SMA and % of the drop can be adjust from the User After that Strategy start taking safe trades if not take profit from the first trade The safe trades are Determined by step down deviation % and by quantity There is no Stop loss is not for one with small tolerance to getting under if any question askChiến lược Pine Script®của fullmax44100
Strategy: HMA 50 + Supertrend SniperHMA 50 + Supertrend Confluence Strategy (Trend Following with Noise Filtering) Description: Introduction and Concept This strategy is designed to solve a common problem in trend-following trading: Lag vs. False Signals. Standard Moving Averages often lag too much, while price action indicators can generate false signals during choppy markets. This script combines the speed of the Hull Moving Average (HMA) with the volatility-based filtering of the Supertrend indicator to create a robust "Confluence System." The primary goal of this script is not just to overlay two indicators, but to enforce a strict rule where a trade is only taken when Momentum (HMA) and Volatility Direction (Supertrend) are in perfect agreement. Why this combination? (The Logic Behind the Mashup) Hull Moving Average (HMA 50): We use the HMA because it significantly reduces lag compared to SMA or EMA by using weighted calculations. It acts as our primary Trend Direction detector. However, HMA can be too sensitive and "whipsaw" during sideways markets. Supertrend (ATR-based): We use the Supertrend (Factor 3.0, Period 10) as our Volatility Filter. It uses Average True Range (ATR) to determine the significant trend boundary. How it Works (Methodology) The strategy uses a boolean logic system to filter out low-quality trades: Bullish Confluence: The HMA must be rising (Slope > 0) AND the Close Price must be above the Supertrend line (Uptrend). Bearish Confluence: The HMA must be falling (Slope < 0) AND the Close Price must be below the Supertrend line (Downtrend). The "Choppy Zone" (Noise Filter): This is a unique feature of this script. If the HMA indicates one direction (e.g., Rising) but the Supertrend indicates the opposite (e.g., Downtrend), the market is considered "Choppy" or indecisive. In this state, the script paints the candles or HMA line Gray and exits all positions (optional setting) to preserve capital. Visual Guide & Signals To make the script easy to interpret for traders who do not read Pine Script, I have implemented specific visual cues: Green Cross (+): Indicates a LONG entry signal. Both HMA and Supertrend align bullishly. Red Cross (X): Indicates a SHORT entry signal. Both HMA and Supertrend align bearishly. Thick Line (HMA): The main line changes color based on the trend. Green: Bullish Confluence. Red: Bearish Confluence. Gray: Divergence/Choppy (No Trade Zone). Thin Step Line: This is the Supertrend line, serving as your dynamic Trailing Stop Loss. Strategy Settings HMA Length: Default is 50 (Mid-term trend). ATR Factor/Period: Default is 3.0/10 (Standard for trend catching). Exit on Choppy: A toggle switch allowing users to decide whether to hold through noise or exit immediately when indicators disagree. Risk Warning This strategy performs best in trending markets (Forex, Crypto, Indices). Like all trend-following systems, it may experience drawdown during prolonged accumulation/distribution phases. Please backtest with your specific asset before using it with real capital.Chiến lược Pine Script®của Gustav_Rex33 1 K
SuperTrend Oscillator [ChartPrime]⯁ OVERVIEW The SuperTrend Oscillator is a hybrid momentum–trend indicator that transforms the classic SuperTrend into a full-strength oscillator. Instead of simply plotting SuperTrend direction on the chart, this tool measures the distance between price and SuperTrend, normalizes it by volatility, and converts it into a dynamic oscillator that highlights trend strength, momentum extremes, and high-precision reversal points. ⯁ CONCEPTS SuperTrend Engine: The indicator extracts the SuperTrend baseline and direction using ATR-based volatility. This acts as the core structure from which the oscillator is built. Volatility-Adjusted Oscillation: (close − SuperTrend) is divided by ATR to standardize momentum across all markets and timeframes. Adaptive Oscillator Types: The signal can be transformed using HMA, EMA, or SMA smoothing for varying responsiveness. Momentum Extremes: Values above +1.7 or below −1.7 signal stretched price conditions where reversals are more likely. Reversal Logic: The oscillator compares its current value with its value three bars ago. Large positive or negative pivots indicate momentum shifts. ⯁ FEATURES Trend-Colored SuperTrend Line The SuperTrend line shifts color based on direction, giving immediate context for oscillator readings. Full Oscillator Transformation Converts price–SuperTrend distance into a normalized oscillator, showing when momentum is expanding, contracting, or reaching exhaustion. Gradient Momentum Coloring The oscillator line and candles are colored using a two-sided gradient: • Red tones for bearish momentum • Orange/cream tones for bullish momentum • Gray tones for low momentum This makes strength visually intuitive. Extreme Zones (±1.7 Bands) Built-in upper and lower thresholds highlight zones where price is statistically overextended. Dual Fill Layers The area above/below zero is filled in different colors to emphasize bullish or bearish oscillator regime. Reversal Diamonds The script highlights significant reversals when: • Momentum shifts downward from high values (bearish pivot) • Momentum shifts upward from deep lows (bullish pivot) These diamonds help pinpoint exhaustion-based turning points. ⯁ HOW TO USE Identify Trend Strength: A rising oscillator above 0 confirms bullish SuperTrend conditions; falling below 0 confirms bearish ones. Spot Momentum Extremes: Readings above +1.7 or below −1.7 often signal overextended price moves. Use Reversal Diamonds as Pivot Alerts: Diamond markers indicate high-probability turning points when momentum sharply reverses from extreme zones. Confirm Trend Shifts with Color Changes: Candle and oscillator colors shift based on momentum direction, providing clean visual alignment with SuperTrend direction. Combine with Structure or OB Zones: Reversal signals become more reliable when they occur at key S/R, order blocks, or liquidity sweeps. ⯁ CONCLUSION The SuperTrend Oscillator modernizes the SuperTrend by transforming it into a volatility-aware oscillator with clear reversal markers, trend coloring, and momentum normalization. This tool is ideal for traders who want both trend context and precise timing signals, blending SuperTrend’s reliability with the dynamics of a professional-grade momentum oscillator. Chỉ báo Pine Script®của ChartPrime77 1.9 K
GK make money strfull automated buy sell signals inspired by nadara watson Chiến lược Pine Script®của gkocakCập nhật 35
Support Line [by rukich]🟠 OVERVIEW The indicator displays a floating line that acts as a support level. It's important to remember that any support level can be broken. 🟠 COMPONENTS The indicator is based on the percentage difference between the closes of the n-th bar back and the current bar. The resulting percentage is smoothed to remove noise. The indicator is displayed as a green-red line (the colors don’t carry meaning — they are used just for visual variety). When the price touches the support level, the bar background turns green. For convenience, there is a label on the right side of the indicator showing the current value of the line. 🟠 HOW TO USE The indicator includes several settings that can be adjusted, though optimal defaults are provided. Settings: Timeframe — specifies which timeframe’s data is used to calculate the line. Candles back — specifies how many bars back from the current one are used. The indicator should be used according to general support-zone logic. Since no support zone guarantees a price bounce, the optimal approach is to confirm the reaction after the price touches the line. Example of use: In the current example, the Timeframe in the indicator settings is set to 1 hour, and the currently open chart is 5 minutes. This means that on the 5-minute chart we see a 1-hour line. After the price touches the support line, you need to see a confirmation of the reaction to understand whether the support zone is holding the price. In the examples, reaction confirmation is shown through: the formation of an M5 shift and the invalidation of an FVG M5- (the latter is more risky than the M5 shift): 🟠 CONCLUSION The indicator shows a floating support zone, and when tested, you should confirm the reaction on a lower timeframe.Chỉ báo Pine Script®của rukich30
Exhaustion Zone [by rukich]🟠 OVERVIEW The indicator shows asset exhaustion — an area of interest where potential buying opportunities can be considered. 🟠 COMPONENTS The indicator is based on a combination of fundamental tools designed to properly react to price movement and volatility. It is displayed on the chart as a green line. When the price touches the indicator line, the candle lights up and is highlighted in green. 🟠 HOW TO USE The best timeframes for using the indicator: 1D and 3D. Since the indicator is used on higher timeframes, the price rarely reaches the indicator line, but it often shows a strong reaction when it does, which suggests that the indicator can be used for investment purposes. Since the zone suggests potential buying opportunities, it’s best to act from the zone only when a reaction is confirmed. Confirmation may include a candle close beyond nearby fractals or the invalidation of the nearest resistance zone. 🟠 CONCLUSION The indicator highlights an area of interest where, upon confirmation of a reaction, buying opportunities may be considered.Chỉ báo Pine Script®của rukichCập nhật 44589
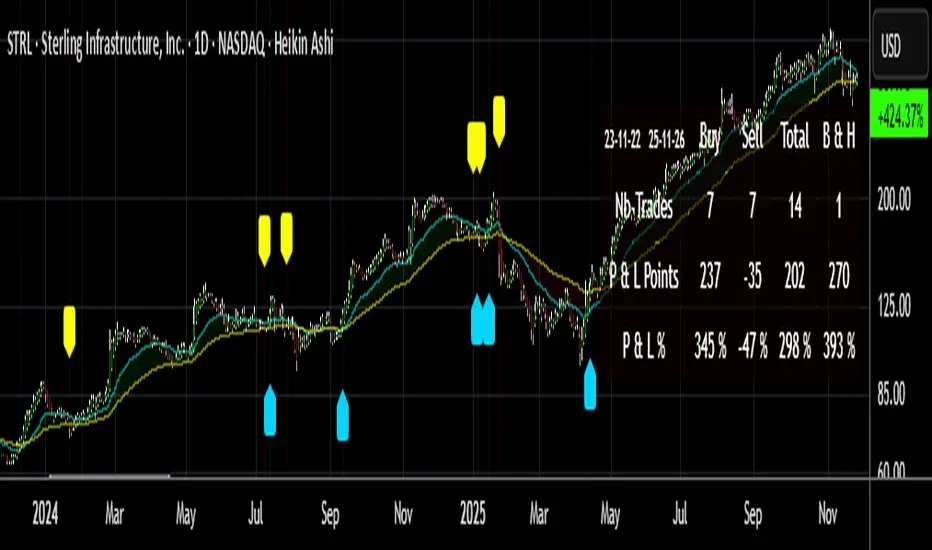
Buy/Sell Signals [WynTrader]Hello dear Friend Here is a new version ( B-S_251121_wt ) of my Buy/Sell Signals indicator. Some calculation updates and useful enhancements have been applied. Concepts This Buy/Sell Signals indicator generates Buy/Sell signals as accurately as possible, identifying trend changes. Compared to other tools that detect trend shifts, this one is simple, easy to use, and demonstrates its efficiency on its own. - Its features are carefully designed to minimize false signals while ensuring optimal signal placement. - The Table results allow you to quickly evaluate signal performance, both on their own and compared to a Buy & Hold strategy. - The Table calculations are fully synchronized with the visible chart (WYSIWYG – What You See Is What You Get). You can also scroll the chart across different date ranges to see how a stock or product performs under various market conditions. - Seeing Buy/Sell signals on a chart is appealing, but assessing their performance in a Table makes it even more convincing. And without running a full backtest, you can get a clear overview of overall performance immediately. Features This indicator generates Buy/Sell signals using: - Fast and Slow Moving Averages (adjustable). - Bollinger Bands (adjustable). - Filters (optional, adjustable) to refine signals, including : Bollinger Bands Lookback Trend Filter; High-Low vs Candle Range Threshold %; Distance from Fast and Slow MAs Threshold %. - Results are displayed in a Table on the chart, based on the currently visible start and end dates. Functionality - The indicator aims to confirm trend changes through timely Buy/Sell signals. - It uses two Moving Averages and Bollinger Bands, combined with filters such as BB Lookback, -- The variable settings have been tested with a mix of manual and AI testing to find the optimal configuration. You can adjust the variables to suit your goals. - The design is simple, with clear parameters and instant readability of Buy/Sell Signals on the chart and in the Table results, without complex interpretation needed. - It works effectively by requiring both trend confirmation and volatility control management. - Signals are timed to be as accurate as possible, avoiding futile weak or false ones. - A Table shows the effectiveness of the signals on the current visible chart, providing immediate, realistic feedback. The Buy & Hold strategy results are also included for comparison with the Buy/Sell swing strategy. The Buy & Hold results start from the first Buy signal to ensure a fair comparison. - Changing the parameters instantly updates the Table, giving a quick, at-a-glance performance check. Caution - No technical tool is perfect; it cannot predict disasters, wars, or the actions of large fund managers or short sellers. - After testing thousands of TradingView indicators over 24 years, I’ve found none to be 100% accurate all the time. - This Buy/Sell Signals indicator may outperform some others but is still not perfect. So, just be aware, and don’t be fooled by this tool. Chỉ báo Pine Script®của Wyn-Trader176
Buy/Sell Hull Crossover Signals (Fast & Slow)This indicator generates buy and sell signals using fast- and slow-period Hull Moving Averages (HMAs). A bullish signal occurs when the fast HMA crosses above the slow HMA, while a bearish signal triggers when it crosses below. To reduce repainting, you can optionally require confirmation on bar close. The script includes visual tools such as a color-shifting ribbon between HMAs, optional background shading to show market regime, and lightweight buy/sell labels for quick signal recognition. Alerts are built in so you can automate notifications when crossover conditions occur. Designed to be simple, responsive, and easy to layer into existing strategies, this indicator helps traders spot momentum shifts and trend transitions with clarity.Chỉ báo Pine Script®của Fancypantsanderson195
McMillan Volatility Bands (MVB) – with Entry Logic// McMillan Volatility Bands (MVB) with signal + entry logic // Author: ChatGPT for OneRyanAlexander // Notes: // - Bands are computed using percentage volatility (log returns), per the Black‑Scholes framing. // - Inner band (default 3σ) and outer band (default 4σ) are configurable. // - A setup occurs when price closes outside the outer band, then closes back within the inner band. // The bar that re‑enters is the "signal bar." We then require price to trade beyond the signal bar's // extreme by a user‑defined cushion (default 0.34 * signal bar range) to confirm entry. // - Includes alertconditions for both setups and confirmed entries.Chỉ báo Pine Script®của ryan.rybarczyk47
BUY/SELL/R/BBuy/Sell/R/B by SeanKidd Purpose: A clean, anchored signal system combining StochRSI crossovers, CVI top/bottom detection, and a MACD direction line that moves with price. ⚙️ How It Works BUY / SELL – Generated from a higher-timeframe StochRSI crossover. BUY (Green) → %K crosses above %D SELL (Red) → %K crosses below %D R (Reverse) – Yellow “R” appears above the candle when the CVI model detects a local top or exhaustion point. B (Bottom) – Blue “B” appears below the candle when CVI detects a local bottom. MACD Direction Line – Green = MACD above Signal → bullish momentum Red = MACD below Signal → bearish momentum The line rides just above the candles, offset by ATR so it always tracks price. 🧭 How to Use It Add the indicator: Search for Buy/Sell/R/B by SeanKidd under Community Scripts. Click ★ to favorite it. Apply it to your chart. Open ⚙️ Settings → Inputs Calculation Timeframe (StochRSI) → pick how fast or slow you want signals (default Weekly). MACD Line Offset (ATR ×) → raise or lower the MACD line if it overlaps candles. Adjust Top/Bottom thresholds to control how often R/B appear. Toggle Highlight bars or Color candles for visual clarity. Go to Settings → Scales and ensure it’s set to ✅ “Scale with Price Chart” or ✅ same scale side as the candles. This keeps everything perfectly attached to the chart. Optional: Add alerts Create → Alert → Condition → Buy/Sell/R/B by SeanKidd Choose: SRSI BUY, SRSI SELL, Top (R), or Bottom (B). 📈 Reading the Chart Marker Meaning Color Position BUY StochRSI %K cross above %D Lime Below bar SELL StochRSI %K cross below %D Red Above bar R CVI-detected top / reversal Yellow Above bar B CVI-detected bottom Blue Below bar Line MACD momentum direction Green/Red Above highs 💡 Tips Works on any symbol or timeframe. Slower charts (Daily–Weekly) give cleaner swing signals. Faster charts (15m–1h) show short-term reversals. Combine the MACD line direction with BUY/SELL for stronger confirmation.Chỉ báo Pine Script®của Seankidd11389
Quantum Fluxtrend [CHE] Quantum Fluxtrend — A dynamic Supertrend variant with integrated breakout event tracking and VWAP-guided risk management for clearer trend decisions. Summary The Quantum Fluxtrend builds on traditional Supertrend logic by incorporating a midline derived from smoothed high and low values, creating adaptive bands that respond to market range expansion or contraction. This results in fewer erratic signals during volatile periods and smoother tracking in steady trends, while an overlaid event system highlights breakout confirmations, potential traps, or continuations with visual lines, labels, and percentage deltas from the close. Users benefit from real-time VWAP calculations anchored to events, providing dynamic stop-loss suggestions to help manage exits without manual adjustments. Overall, it layers signal robustness with actionable annotations, reducing noise in fast-moving charts. Motivation: Why this design? Standard Supertrend indicators often generate excessive flips in choppy conditions or lag behind in low-volatility drifts, leading to whipsaws that erode confidence in trend direction. This design addresses that by centering bands around a midline that reflects recent price spreads, ensuring adjustments are proportional to observed variability. The added event layer captures regime shifts explicitly, turning abstract crossovers into labeled milestones with trailing VWAP for context, which helps traders distinguish genuine momentum from fleeting noise without over-relying on raw price action. What’s different vs. standard approaches? - Baseline reference: Diverges from the classic Supertrend, which uses average true range for fixed offsets from a median price. - Architecture differences: - Bands form around a central line averaged from smoothed highs and lows, with offsets scaled by half the range between those smooths. - Regime direction persists until a clear breach of the prior opposite band, preventing premature reversals. - Event visualization draws persistent lines from flip points, updating labels based on price sustainment relative to the trigger level. - VWAP resets at each event, accumulating volume-weighted prices forward for a trailing reference. - Practical effect: Charts show fewer direction changes overall, with color-coded annotations that evolve from initial breakout to continuation or trap status, making it easier to spot sustained moves early. VWAP lines provide a volume-informed anchor that curves with price, offering visual cues for adverse drifts. How it works (technical) The process starts by smoothing high and low prices over a user-defined period to form upper and lower references. A midline sits midway between them, and half the spread acts as a base for band offsets, adjusted by a multiplier to widen or narrow sensitivity. On each bar, the close is checked against the previous bar's opposite band: crossing above expands the lower band downward in uptrends, or below contracts the upper band upward in downtrends, creating a ratcheting effect that locks in direction until breached. Persistent state tracks the current regime, seeding initial bands from the smoothed values if no prior data exists. Flips trigger new horizontal lines at the breach level, styled by direction, alongside labels that monitor sustainment—price holding above for up-flips or below for down-flips keeps the regime, while reversal flags a trap. Separately, at each flip, a dashed VWAP line initializes at the breach price and extends forward, accumulating the product of typical prices and volumes divided by total volume. This yields a curving reference that updates bar-by-bar. Warnings activate if price strays adversely from this VWAP, tinting the background for quick alerts. No higher timeframe data is pulled, so all computations run on the chart's native resolution, avoiding lookahead biases unless repainting is enabled via input. Parameter Guide SMA Length — Controls smoothing of highs and lows for midline and range base; longer values dampen noise but increase lag. Default: 20. Trade-offs: Shortens responsiveness in trends (e.g., 10–14) but risks more flips; extend to 30+ for stability in ranging markets. Multiplier — Scales band offsets from the half-range; higher amplifies to capture bigger swings. Default: 1.0. Trade-offs: Above 1.5 widens for volatile assets, reducing false signals; below 0.8 tightens for precision but may miss subtle shifts. Show Bands — Toggles visibility of basic and adjusted band lines for reference. Default: false. Tip: Enable briefly to verify alignment with price action. Show Background Color — Displays red tint on VWAP adverse crosses for visual warnings. Default: false. Trade-offs: Helps in live monitoring but can clutter clean charts. Line Width — Sets thickness for event and VWAP lines. Default: 2. Tip: Thicker (3–5) for emphasis on key levels. +Bars after next event — Extends old lines briefly before cleanup on new flips. Default: 20. Trade-offs: Longer preserves history (40+) at resource cost; shorter keeps charts tidy. Allow Repainting — Permits live-bar updates for smoother real-time view. Default: false. Tip: Disable for backtest accuracy. Extension 1 Settings (Show, Width, Size, Decimals, Colors, Alpha) — Manages dotted connector from event label to current close, showing percentage change. Defaults: Shown, width 2, normal size, 2 decimals, lime/red for gains/losses, gray line, 90% transparent background. Trade-offs: Fewer decimals for clean display; adjust alpha for readability. Extension 2 Settings (Show, Method, Stop %, Ticks, Decimals, Size, Color, Inherit, Alpha) — Positions stop label at VWAP end, offset by percent or ticks. Defaults: Shown, percent method, 1.0%, 20 ticks, 4 decimals, normal size, white text, inherit tint, 0% alpha. Trade-offs: Percent for proportional risk; ticks for fixed distance in tick-based assets. Alert Toggles — Enables notifications for breakouts, continuations, traps, or VWAP warnings. All default: true. Tip: Layer with chart alerts for multi-condition setups. Reading & Interpretation The main Supertrend line colors green for up-regimes (price above lower band) and red for down (below upper band), serving as a dynamic support/resistance trail. Flip shapes (up/down triangles) mark regime changes at band breaches. Event lines extend horizontally from flips: green for bull, red for bear. Labels start blank and update to "Bull/Bear Cont." if price sustains the direction, or "Trap" if it reverses, with colors shifting lime/red/gray accordingly. A dotted vertical links the trailing label to the current close, mid-labeled with the percentage delta (positive green, negative red). VWAP dashes yellow (bull) or orange (bear) from the event, curving to reflect volume-weighted average. At its end, a left-aligned label shows suggested stop price, annotated with offset details. Background red hints at weakening if price crosses VWAP opposite the regime. Deltas near zero suggest consolidation; widening extremes signal momentum buildup or exhaustion. Practical Workflows & Combinations - Trend following: Enter long on green flip shapes confirmed by higher highs, using the event line as initial stop below. Trail stops to VWAP for bull runs, exiting on trap labels or red background warnings. Filter with volume spikes to avoid low-conviction breaks. - Exits/Stops: Conservative: Set hard stops at suggested SL labels. Aggressive: Hold through minor traps if delta stays positive, but cut on regime flip. Pair with momentum oscillators for overbought pullbacks. - Multi-asset/Multi-TF: Defaults suit forex/stocks on 15m–4H; for crypto, bump multiplier to 1.5 for volatility. Scale SMA length proportionally across timeframes (e.g., double for daily). Combine with structure tools like Fibonacci for confluence on event lines. Behavior, Constraints & Performance Live bars update lines and labels dynamically if repainting is allowed, but signals confirm on close for stability—flips only trigger post-bar. No higher timeframe calls, so no inherent lookahead, though volume weighting assumes continuous data. Resources cap at 1000 bars back, 50 lines/labels max; events prune old ones on new flips to stay under budget, with brief extensions for visibility. Arrays or loops absent, keeping it lightweight. Known limits include lag in extreme gaps (e.g., overnight opens) where bands may not adjust instantly, and VWAP sensitivity to sparse volume in illiquid sessions. Sensible Defaults & Quick Tuning Start with SMA 20, multiplier 1.0 for balanced response across majors. For choppy pairs: Lengthen SMA to 30, multiplier 0.8 to tighten bands and cut flips. For trending equities: Shorten to 14, multiplier 1.2 for quicker entries. If traps dominate, enable bands to inspect range compression; for sluggish signals, reduce extension bars to focus on recent events. What this indicator is—and isn’t This serves as a visualization and signal layer for trend regimes and breakouts, highlighting sustainment via annotations and risk cues through VWAP—ideal atop price action for confirmation. It is not a standalone system, predictive oracle, or risk calculator; always integrate with broader analysis, position sizing, and stops. Use responsibly as an educational tool. Disclaimer The content provided, including all code and materials, is strictly for educational and informational purposes only. It is not intended as, and should not be interpreted as, financial advice, a recommendation to buy or sell any financial instrument, or an offer of any financial product or service. All strategies, tools, and examples discussed are provided for illustrative purposes to demonstrate coding techniques and the functionality of Pine Script within a trading context. Any results from strategies or tools provided are hypothetical, and past performance is not indicative of future results. Trading and investing involve high risk, including the potential loss of principal, and may not be suitable for all individuals. Before making any trading decisions, please consult with a qualified financial professional to understand the risks involved. By using this script, you acknowledge and agree that any trading decisions are made solely at your discretion and risk. Do not use this indicator on Heikin-Ashi, Renko, Kagi, Point-and-Figure, or Range charts, as these chart types can produce unrealistic results for signal markers and alerts. Best regards and happy trading ChervolinoChỉ báo Pine Script®của chervolino399
PDB - RSI Based Buy/Sell signals with 4 MARSI Based Buy/Sell Signals on Price chart + 4 MA System This indicator plots RSI-based Buy & Sell signals directly on the price chart , combined with a 4-Moving-Average trend filter (20/50/100/200) for higher accuracy and cleaner trade timing. The signal triggers when RSI reaches user-defined overbought/oversold levels, but unlike a standard RSI, this version plots the signals **on the chart**, not in the RSI window — making entries and exits easier to see in real time. RSI Levels Are Fully Customizable The default RSI thresholds are 30 (oversold) and 70 (overbought). However, you can adjust these to fit your trading style. For example: > When day trading on the 5–15 min timeframe, I personally use 35 (oversold) and 75 (overbought) to catch moves earlier. > The example shown in the preview image uses 10-minute timeframe settings. You can change the RSI levels to trigger signals from **any value you choose**, allowing you to tailor the indicator to scalping, day trading, or swing trading. 4 Moving Averages Included: 20, 50, 100, 200 MAs act as dynamic trend filters so you can: ✔ trade signals only in the direction of trend ✔ avoid false reversals ✔ identify momentum shifts more clearly Works on all markets and timeframes — crypto, stocks, FX, indices. Chỉ báo Pine Script®của PrintDemBandz104
Buy/Sell Signals [WynTrader]My name is WynTrader. I cumulate 24 years of experience. This Indicator produces Buy/Sell Signals using these features: - Fast and Slow Moving averages (modifiable) optimized at EMA-8 and SMA-35 - Bollinger Bands (modifiable) optimized at Basis-18 and Multiplier-1 Also, the Buy/Sell Signals are conditioned by three Filters (optionable, modifiable) : . Bollinger-Bands Lookback . High-Low vs Candle Range % . Distance from Fast and Slow Moving averages % The Results Calculation presented in a Table are based : - on the Current Chart Visible Range (optionable) or - on the specified TIme Frame Start and End Dates (modifiable) The Table shows Calculation Results of the Buy and Sell Signals that are activated on the chart, with the Number of Trades (Signals), the Winning Points and the Win Rate %. The Buy&Hold starts calculation at the first Buy encountered. So be surprised by my Buy/Sell Indicator. But always remember that the world is not perfect. The Graal Indicator, even with AI, doesn't already exist, maybe one day (all of us richier...), but not now. , depending on the chart product (stocks...), volatility, probabilities, unpredictable behaviour. , the moves, etc. Enjoy WynTrader P. s. : My name is WynTrader. I cumulate 24 years of experience. In 2001, I took an intensive technical analysis course taught by an exceptional friend, Cyril, who taught me everything I know. The foundation I gained through his teaching remains solid and relevant to this day, never failing me. Before i made this Indicator, I have used many Trading View Buy/Sell Indicators using alone or combined RSI, SMI, OBV, MACD ATR, ADX, Neural, Fractal, Geometry, etc., that are already available for the Trading View community. A great thanks to those who give their time that help me build this tool. Note that I'm not a programmer, so... ;-) Chỉ báo Pine Script®của Wyn-TraderCập nhật 44185
Multi-Timeframe MACD with Color Mix (Nikko)Multi-Timeframe MACD with Color Mix (Nikko) Indicator This documentation explains the benefits of the "Multi-Timeframe MACD with Color Mix (Nikko)" indicator for traders and provides easy-to-follow steps on how to use it. Written as of 05:06 AM +07 on Saturday, October 04, 2025, this guide focuses on helping you, as a trader, get the most out of this tool with clear, practical advice before diving into the technical details. Benefits for Traders 1. Multi-Timeframe Insight This indicator lets you see momentum trends across 15-minute, 1-hour, 1-day, and 1-week timeframes all on one chart. This big-picture view helps you catch both quick market moves and long-term trends without flipping between charts, saving you time and giving you a fuller understanding of the market. 2. Visual Momentum Representation The background changes from red to green based on short-term (15m) momentum, giving you a quick, easy-to-see signal—red means bearish (prices might drop), and green means bullish (prices might rise). The histogram uses a mix of red, green, and blue colors to show the combined strength of the 1-hour, 1-day, and 1-week timeframes, helping you spot strong trends at a glance (e.g., a bright mix for strong momentum, darker for weaker). 3. Enhanced Decision-Making The background and histogram colors work together to confirm trends across different timeframes, making it less likely you’ll act on a false signal. This helps you feel more confident when deciding when to buy, sell, or hold. 4. Proactive Alert System You can set alerts to notify you when the percentage of bullish timeframes hits your chosen levels (e.g., below 10% for bearish, above 90% for bullish). This keeps you in the loop on big momentum shifts without needing to watch the chart all day—perfect for when you’re busy. 5. Flexibility and Efficiency You can turn timeframes on or off, adjust settings like speed of the moving averages, and tweak transparency to fit your trading style—whether you’re a fast scalper or a patient swing trader. Everything is shown on one chart, saving you effort, and the colors make it simple to read, even if you’re new to trading. How to Use It Getting Started Add the Indicator: Load the "Multi-Timeframe MACD with Color Mix (Nikko)" onto your TradingView chart using the Pine Script editor or indicator library. Pick Your Timeframes: Turn on the timeframes that match your trading—use 15m and 1h for quick trades, or 1d and 1w for longer holds—using the enable_15m, enable_1h, enable_1d, enable_1w, and enable_background options. Reading the Colors Background Gradient: Watch for red to signal bearish 15m momentum and green for bullish momentum. Adjust the Background_transparency (default 75%, or 25% opacity) if the chart feels too busy—try lowering it to 50 for clearer candlesticks in fast markets. Histogram and EMA Colors: The histogram and its Exponential Moving Average (EMA) line show a mix of red (1-week), green (1-day), and blue (1-hour) based on how strong the momentum is in each timeframe. Brighter colors mean stronger momentum—white (all bright) shows all timeframes are pushing up hard, while darker shades (like gray or black) mean weaker or mixed momentum. Turn off a timeframe (e.g., enable_1h = false) to see how it changes the color mix and focus on what matters to you. Setting Alerts Set Your Levels: Choose a threshold_low (default 10%) and threshold_high (default 90%) based on your comfort zone or past market patterns to catch big turns. Get Notifications: Use TradingView alerts to get pings when the market hits your set levels, so you can act without staring at the screen. Practical Tips Pair with Other Tools: Use it with support/resistance lines or the RSI to double-check your moves and build a solid plan. Tweak Settings: Adjust fast_length, slow_length, and signal_smoothing to match your asset’s speed, and bump up the lookback (default 50) for steadier trends in wild markets. Practice First: Test different timeframe combos on a demo account to find what works best for you. Understanding the Colors (Simple Explanation) How Colors Work The histogram and its EMA line use a color mix based on a simple idea from color theory, like mixing paints with red, green, and blue (RGB): Red comes from the 1-week timeframe, green from 1-day, and blue from 1-hour. When all three timeframes show strong upward momentum, they blend into bright white—the brightest color, like a super-bright light telling you the market’s roaring up. If some timeframes are weak or pulling down, the mix gets darker (like gray or black), warning you the momentum might not be solid. Brighter is Better Bright Colors = Strong Opportunity: The brighter the histogram and EMA (closer to white), the more all your chosen timeframes are in agreement that prices are rising. This is your signal to think about buying or holding, as it points to a powerful trend you can ride. Dark Colors = Caution: A darker mix (toward black) means some timeframes are lagging or bearish, suggesting you might wait or consider selling. It’s like a dim light saying, “Hold on, check again.” Benefit in Practice: Watching the brightness helps you jump on the best trades fast. For example, a bright white histogram on a green background is like a green traffic light—go for it! A dark gray on red is like a red light—pause and rethink. This quick color check can save you from bad moves and boost your profits when the trend is strong. Why It Helps These colors are your fast friend in trading. A bright histogram means all your timeframes are cheering for an uptrend, giving you the confidence to act. A dull one tells you to be careful, helping you avoid traps. It’s like having a color-coded guide to pick the hottest market moments! Technical Details Input Parameters Fast Length (default: 12): Short-term moving average speed. Slow Length (default: 26): Long-term moving average speed. Source (default: close): Price data used. Signal Smoothing (default: 9): Smooths the signal line. MA Type (default: EMA): Choose EMA or SMA. Timeframe and Scaling Timeframes: 15m, 1h, 1d, 1w, with on/off switches. Lookback Period (default: 50): Sets the data window for trends. Background Transparency (default: 75%): Controls background see-through level. MACD Calculation Per Timeframe: Uses request.security(): MACD Line: ta.ema(src, fast_length) - ta.ema(src, slow_length). Signal Line: ta.ema(MACD, signal_length). Histogram: (macd - signal) / 3.0. Background Gradient 15m Normalization: norm_value = (hist_15m - hist_15m_min) / max(hist_15m_range, 1e-10), limited to 0-1. RGB Mix: Red drops from 255 to 0, green rises from 0 to 255, blue stays 0. Apply: color.new(color.rgb(r_val, g_val, b_val), Background_transparency). Histogram and EMA Colors Color Assignment: 1h: Blue (#0000FF) if hist_1h >= 0, else black. 1d: Green (#00FF00) if hist_1d >= 0, else black. 1w: Red (#FF0000) if hist_1w >= 0, else black. Final Color: final_color = color.rgb(min(r, 255), min(g, 255), min(b, 255)). Plotting: Histogram and EMA use final_color; MACD (#2962FF), signal (#FF6D00). Alerts Bullish Percentage: bullish_pct = (bullish_count / bullish_total) * 100, counting hist >= 0. Triggers: Below threshold_low or above threshold_high. -------------------------------------------------------------------- Conclusion The "Multi-Timeframe MACD with Color Mix (Nikko)" is your all-in-one tool to spot trends, confirm moves, and trade smarter with its bright, easy-to-read colors. By using it wisely, you can sharpen your market edge and trade with more confidence. This README is tailored for traders and reflects the indicator's practical value as of 05:06 AM +07 on October 04, 2025.Chỉ báo Pine Script®của CryptoNikkoidCập nhật 58