ZVOL — Z-Score Volume Heatmapⓩ ZVOL transforms raw volume into a statistically calibrated heatmap using Z-score thresholds. Unlike classic volume indicators that rely on fixed MA comparisons, ZVOL calculates how many standard deviations each volume bar deviates from its mean. This makes the reading adaptive across timeframes and assets, in order to distinguish meaningful crowd behavior from random volatility.
📊 The core display is a five-zone histogram, each encoded by color and statistical depth. Optional background shading mirrors these zones across the entire pane, revealing subtle compression or structural rhythm shifts across time. By grounding the volume reading in volatility-adjusted context, ZVOL inhibits impulsive trading tactics by compelling the structure, not the sentiment, to dictate the signal.
🥵 Heatmap Coloration:
🌚 Suppressed volume — congestion, coiling phases
🩱 Stable flow — early trend or resting volume
🏀 High activity — emerging pressure
💔 Extreme — possible climax or institutional print
🎗️ A dynamic Fibonacci-based 21:34-period EMA ribbon overlays the histogram. The fill area inverts color on crossover, providing a real-time read on tempo, expansion, or divergence between price structure and crowd effort.
💡 LTF Usage Suggestions:
• Confirm breakout legs when orange or red zones align with range exits
• Fade overextended moves when red bars appear into resistance
• Watch for rising EMAs and orange volume to front-run impulsive moves
• Combine with volatility suppression (e.g. ATR) to catch compression → expansion transitions
🥂 Ideal Pairings:
• OBVX Conviction Bias — to confirm directional intent behind volume shifts
• SUPeR TReND 2.718 — for directional filters
• ATR Turbulence Ribbon — to detect compression phases
👥 The OBVX Conviction Bias adds a second dimension to ZVOL by revealing whether crowd effort is aligning with price direction or diverging beneath the surface. While ZVOL identifies statistical anomalies in raw volume, OBVX tracks directional commitment using cumulative volume and moving average cross logic. Use them together to spot fake-outs, anticipate structure-confirmed breakouts, or time pullbacks with volume-based conviction.
🔬 ZVOL isn’t just a volume filter — it’s a structural lens. It reveals when crowd effort is meaningful, when it's fading, and when something is about to shift. Designed for structure-aware traders who care about context, not noise.
Sentiment

Market Regime Candle DominanceDescription: This script, "Market Regime Candle Dominance," overlays a TradingView chart to visually identify market regimes—bullish trends, bearish trends, or ranging markets—using adaptive calculations and volatility detection. It dynamically colors candles and highlights the background to indicate current market conditions.
How It Works:
Inputs:
Users define colors for bullish, bearish, and ranging trends, adjust sensitivity thresholds for volatility and trends, and set an adaptive calculation length.
Adaptive Calculation:
A period adjustment factor (calcPeriod) dynamically alters based on the chart's timeframe, ensuring meaningful calculations across different timeframes.
Volatility and Trend Detection:
Using the True Range (ta.tr) and price change (close - close ), the script calculates volatility and trend strength to determine market conditions.
Trend sensitivity is adjustable through thresholds (trendThreshold), enabling finer or broader regime detection.
Market Regime Identification:
Bullish Trend: Detected when trendStrength > trendThreshold.
Bearish Trend: Triggered when trendStrength < -trendThreshold.
Ranging Market: Identified when neither bullish nor bearish trends are present.
Candle Coloring:
Candles are colored according to the market regime:
Green for bullish trends.
Red for bearish trends.
Blue (semi-transparent) for ranging markets.
Background Highlights:
An optional feature (highlightRegime) adds semi-transparent background colors corresponding to the detected regime, enhancing visual clarity of the chart.
Features:
Adaptive Sensitivity: Adjusts the calculation length and thresholds for precision across different chart timeframes.
Customizable Display: Allows users to personalize colors and enable/disable background highlights.
Visual Clarity: Simplifies the identification of market regimes, providing clear direction at a glance.

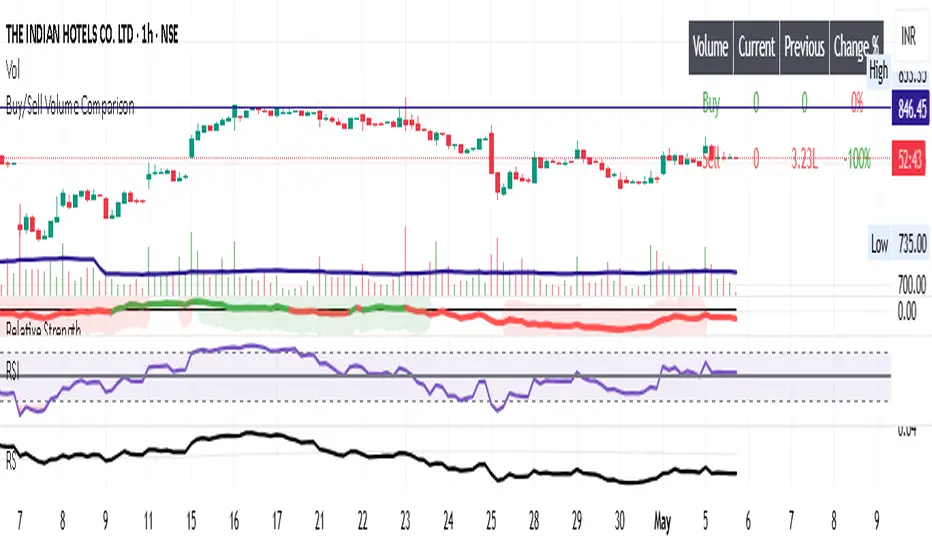
Buy/Sell Volume ComparisonKey improvements:
Direct volume comparison: Now shows the current day's volume and previous day's volume side by side
Percentage change display: Clear percentage change with up/down arrows
Table position customization: Added a dropdown menu to select where you want the table to appear
To adjust the table position:
Click on the settings (gear icon) for the indicator after adding it to your chart
You'll see a dropdown menu labeled "Table Position"
Select from options like "Top Right", "Bottom Left", etc.
Click "OK" to apply your changes
This version also handles the case where there's no previous volume data (first bar of the chart) by checking for NA values.
Let me know if this meets your requirements, or if you'd like any other adjustments!RetryClaude does not have the ability to run the code it generates yet.Claude can make mistakes. Please double-check responses.Tip: Long chats cause you to reach your usage limits faster.
Delta Zones🔶 Delta Zones — A Precision Tool for Time-Price Mapping 🔶
The Delta Zones indicator is a refined structure-mapping tool that dynamically tracks zones of dominant trading activity across recent sessions.
These zones are projected forward in time, offering traders a reliable visual guide to where significant interactions between buyers and sellers are likely to take place.
This tool was designed for intraday use, but its adaptability makes it powerful even on higher timeframes, giving traders insights into market behavior without the noise. You need to change session setting from indicator to higher TF that the chart. For intra, its by default on daily.
🔧 What This Indicator Does
Detects and displays the key activity zone for the current session (today).
Recalls the most active zone from the previous session, allowing you to track momentum or reversal bias.
Color codes each zone based on where price currently trades relative to it:
Neutral gradient (orange/white) for today’s zone, showing where price is consolidating or reacting.
Bullish green fade if price is trading above yesterday’s zone.
Bearish red fade if price is trading below yesterday’s zone.
Extends each zone forward (default 200 bars) so you can observe price behavior as it revisits these areas over time.
📈 How to Use Delta Zones
Trend Continuation:
If price pushes beyond today's zone and maintains momentum, it may suggest strength in that direction. Watch how price reacts on retests of this zone.
Fade or Mean Reversion:
When price strays far from a Delta Zone and struggles to gain ground, it often rotates back into that region. These situations can offer attractive risk-reward setups.
Zone Polarity from Prior Sessions:
Yesterday’s zone serves as a directional cue — if price opens and stays above it (green-filled), sentiment favors strength. If it stays below (red-filled), weakness may persist.
Support/Resistance Anchors:
Use zones as dynamic S/R levels — watch for wick tests, engulfing candles, or volume surges at zone edges for potential trade entries or exits.
🎛️ Inputs You Can Control
Session Length (Default: Daily): Defines how often a new zone is calculated.
💡 Pro Tip
These zones act like magnetic fields around price — not only can they contain price, but they also attract it. The key is to recognize when price is respecting, rejecting, or absorbing at the edges of the zone.
Pair Delta Zones with your favorite price action, momentum, or volume tools for sharper decision-making. For example, "Accumulation/Distribution Money Flow" script which I published few days ago.
⚠️ Note
This is a conceptually adaptive framework designed to simplify the visual structure of the market. While no model guarantees predictive accuracy, Delta Zones are especially useful for contextualizing price behavior and anticipating where meaningful reactions may occur.
This is an educational idea, use it at your own risk.
Past performance does not guarantee future success.

EMA-Based Squeeze Dynamics (Gap Momentum & EWMA Projection)EMA-Based Squeeze Dynamics (Gap Momentum & EWMA Projection)
🚨 Main Utility: Early Squeeze Warning
The primary function of this indicator is to warn traders early when the market is approaching a "squeeze"—a tightening condition that often precedes significant moves or regime shifts. By visually highlighting areas of increasing tension, it helps traders anticipate potential volatility and prepare accordingly. This is intended to be a statistically and psychologically grounded replacement of so-called "fib-time-zones," which are overly-deterministic and subjective.
📌 Overview
The EMA-Based Squeeze Dynamics indicator projects future regime shifts (such as golden and death crosses) using exponential moving averages (EMAs). It employs historical interval data and current market conditions to dynamically forecast when the critical EMAs (50-period and 200-period) will reconverge, marking likely trend-change points.
This indicator leverages two core ideas:
Behavioral finance theory: Traders often collectively anticipate popular EMA crossovers, creating a self-fulfilling prophecy (normative social influence), similar to findings from Solomon Asch’s conformity experiments.
Bayesian-like updates: It utilizes historical crossover intervals as a prior, dynamically updating expectations based on evolving market data, ensuring its signals remain objectively grounded in actual market behavior.
⚙️ Technical & Mathematical Explanation
1. EMA Calculations and Regime Definitions
The indicator uses three EMAs:
Fast (9-period): Represents short-term price movement.
Medial (50-period): Indicates medium-term trend direction.
Slow (200-period): Defines long-term market sentiment.
Regime States:
Bullish: 50 EMA is above the 200 EMA.
Bearish: 50 EMA is below the 200 EMA.
A shift between these states triggers visual markers (arrows and labels) directly on the chart.
2. Gap Dynamics and Historical Intervals
At each crossover:
The indicator records the gap (distance) between the 50 and 200 EMAs.
It tracks the historical intervals between past crossovers.
An Exponentially Weighted Moving Average (EWMA) of these intervals is calculated, weighting recent intervals more heavily, dynamically updating expectations.
Important note:
After every regime shift, the projected crossover line resets its calculation. This reset is visually evident as the projection line appears to move further away after each regime change, temporarily "repelled" until the EMAs begin converging again. This ensures projections remain realistic, grounded in actual EMA convergence, and prevents overly optimistic forecasts immediately after a regime shift.
3. Gap Momentum & Adaptive Scaling
The indicator measures how quickly or slowly the gap between EMAs is changing ("gap momentum") and adjusts its forecast accordingly:
If the gap narrows rapidly, a crossover becomes more imminent.
If the gap widens, the next crossover is pushed further into the future.
The "gap factor" dynamically scales the projection based on recent gap momentum, bounded between reasonable limits (0.7–1.3).
4. Squeeze Ratio & Background Color (Visual Cues)
A "squeeze ratio" is computed when market conditions indicate tightening:
In a bullish regime, if the fast EMA is below the medial EMA (price pulling back towards long-term support), the squeeze ratio increases.
In a bearish regime, if the fast EMA rises above the medial EMA (price rallying into long-term resistance), the squeeze ratio increases.
What the Background Colors Mean:
Red Background: Indicates a bullish squeeze—price is compressing downward, hinting a bullish reversal or continuation breakout may occur soon.
Green Background: Indicates a bearish squeeze—price is compressing upward, suggesting a bearish reversal or continuation breakout could soon follow.
Opacity Explanation:
The transparency (opacity) of the background indicates the intensity of the squeeze:
High Opacity (solid color): Strong squeeze, high likelihood of imminent volatility or regime shift.
Low Opacity (faint color): Mild squeeze, signaling early stages of tightening.
Thus, more vivid colors serve as urgent visual warnings that a squeeze is rapidly intensifying.
5. Projected Next Crossover and Pseudo Crossover Mechanism
The indicator calculates an estimated future bar when a crossover (and thus, regime shift) is expected to occur. This calculation incorporates:
Historical EWMA interval.
Current squeeze intensity.
Gap momentum.
A dynamic penalty based on divergence from baseline conditions.
The "Pseudo Crossover" Explained:
A key adaptive feature is the pseudo crossover mechanism. If price action significantly deviates from the projected crossover (for example, if price stays beyond the projected line longer than expected), the indicator acknowledges the projection was incorrect and triggers a "pseudo crossover" event. Essentially, this acts as a reset, updating historical intervals with a weighted adjustment to recalibrate future predictions. In other words, if the indicator’s initial forecast proves inaccurate, it recognizes this quickly, resets itself, and tries again—ensuring it remains responsive and adaptive to actual market conditions.
🧠 Behavioral Theory: Normative Social Influence
This indicator is rooted in behavioral finance theory, specifically leveraging normative social influence (conformity). Traders commonly watch EMA signals (especially the 50 and 200 EMA crossovers). When traders collectively anticipate these signals, they begin trading ahead of actual crossovers, effectively creating self-fulfilling prophecies—similar to Solomon Asch’s famous conformity experiments, where individuals adopted group behaviors even against direct evidence.
This behavior means genuine regime shifts (actual EMA crossovers) rarely occur until EMAs visibly reconverge due to widespread anticipatory trading activity. The indicator quantifies these dynamics by objectively measuring EMA convergence and updating projections accordingly.
📊 How to Use This Indicator
Monitor the background color and opacity as primary visual cues.
A strongly colored background (solid red/green) is an early alert that a squeeze is intensifying—prepare for potential volatility or a regime shift.
Projected crossover lines give a dynamic target bar to watch for trend reversals or confirmations.
After each regime shift, expect a reset of the projection line. The line may seem initially repelled from price action, but it will recalibrate as EMAs converge again.
Trust the pseudo crossover mechanism to automatically recalibrate the indicator if its original projection misses.
🎯 Why Choose This Indicator?
Early Warning: Visual squeeze intensity helps anticipate market breakouts.
Behaviorally Grounded: Leverages real trader psychology (conformity and anticipation).
Objective & Adaptive: Uses real-time, data-driven updates rather than static levels or subjective analysis.
Easy to Interpret: Clear visual signals (arrows, labels, colors) simplify trading decisions.
Self-correcting (Pseudo Crossovers): Quickly adjusts when initial predictions miss, maintaining accuracy over time.
Summary:
The EMA-Based Squeeze Dynamics Indicator combines behavioral insights, dynamic Bayesian-like updates, intuitive visual cues, and a self-correcting pseudo crossover feature to offer traders a reliable early warning system for market squeezes and impending regime shifts. It transparently recalibrates after each regime shift and automatically resets whenever projections prove inaccurate—ensuring you always have an adaptive, realistic forecast.
Whether you're a discretionary trader or algorithmic strategist, this indicator provides a powerful tool to navigate market volatility effectively.
Happy Trading! 📈✨

RVOL Effort Matrix💪🏻 RVOL Effort Matrix is a tiered volume framework that translates crowd participation into structure-aware visual zones. Rather than simply flagging spikes, it measures each bar’s volume as a ratio of its historical average and assigns to that effort dynamic tiers, creating a real-time map of conviction , exhaustion , and imbalance —before price even confirms.
⚖️ At its core, the tool builds a histogram of relative volume (RVOL). When enabled, a second layer overlays directional effort by estimating buy vs sell volume using candle body logic. If the candle closes higher, green (buy) volume dominates. If it closes lower, red (sell) volume leads. These components are stacked proportionally and inset beneath a colored cap line—a small but powerful layer that maintains visibility of the true effort tier even when split bars are active. The cap matches the original zone color, preserving context at all times.
Coloration communicates rhythm, tempo, and potential turning points:
• 🔴 = structurally weak effort, i.e. failed moves, fake-outs or trend exhaustion
• 🟡 = neutral volume, as seen in consolidations or pullbacks
• 🟢 = genuine commitment, good for continuation, breakout filters, or early rotation signals
• 🟣 = explosive volume signaling either climax or institutional entry—beware!
Background shading (optional) mirrors these zones across the pane for structural scanning at a glance. Volume bars can be toggled between full-stack mode or clean column view. Every layer is modular—built for composability with tools like ZVOL or OBVX Conviction Bias.
🧐 Ideal Use-Cases:
• 🕰 HTF bias anchoring → LTF execution
• 🧭 Identifying when structure is being driven by real crowd pressure
• 🚫 Fading green/fuchsia bars that fail to break structure
• ✅ Riding green/fuchsia follow-through in directional moves
🍷 Recommended Pairings:
• ZVOL for statistically significant volume anomaly detection
• OBVX Conviction Bias ↔️ for directional confirmation of effort zones
• SUPeR TReND 2.718 for structure-congruent entry filtering
• ATR Turbulence Ribbon to distinguish expansion pressure from churn
🥁 RVOL Effort Matrix is all about seeing—how much pressure is behind a move, whether that pressure is sustainable, and whether the crowd is aligned with price. It's volume, but readable. It’s structure, but dynamic. It’s the difference between obeying noise and trading to the beat of the market.

OBVX Conviction Bias🧮 The OBVX Conviction Bias overlay tracks the flow of directional volume using the classic On-Balance Volume calculation, then filters it through a layered moving average system to expose crowd commitment , pressure transitions , and momentum fatigue . The tool applies two smoothed averages to the OBV line—a fast curve and a longer-term baseline scaled using Euler’s constant (2.718)—and visualizes their relationship using a color-coded crossover ribbon and pressure fills. When used correctly, it reveals whether a move is being supported by meaningful volume, or whether the crowd is starting to disengage.
🚦 The core signal compares OBV to its fast moving average. When OBV climbs above the short average, it fills green—suggesting real directional effort. When OBV sinks below, the fill turns maroon—flagging fading conviction or pullback potential. A second fill between the short and long OBV moving averages captures the broader trend of volume intention. If the short is above the long, this space fills greenish, showing constructive pressure. If it flips, the fill fades red, signaling crowd hesitation, rotation, or early exhaustion.
⚖️ All smoothing is user-selectable, defaulting to VWMA for effort-sensitive structure. The long-term average is auto-scaled using the natural exponential multiplier (2.718), offering rhythm that reflects the curve of participation. OBVX Conviction Bias isn’t trying to predict—it’s trying to show you where the crowd is leaning , and whether that lean is gaining traction or losing strength.
🧐 Ideal Use-Cases:
• Detect divergence between volume flow and price action
• Confirm breakout validity with volume alignment
• Fade breakouts where OBV fails to follow through
• Time pullback entries when OBV pressure resumes in trend direction
🍷 Recommended Pairings:
• ZVOL to measure whether volume is statistically significant or just noise (as shown)
• RVOL Effort Matrix to validate crowd effort by tier and structure zone
• SUPeR TReND 2.718 and/or MA Ribbons for directional confluence
• ATR Turbulence to track volatility-phase alignment with volume intention

DoloresOverview
The "Dolores Trading Assistant" is a sleek and intuitive indicator designed to empower traders during the high-volatile New York trading session. This tool overlays a customizable table on your chart, presenting real-time insights from key market internals—NYSE and Nasdaq Advance/Decline (A/D), Volume Difference (VOLD), and TICK—in a clear, color-coded format. Its streamlined design focuses on delivering essential market data with trend states, making it a practical companion for assessing momentum and sentiment at a glance.
Purpose and Usefulness
Tailored for intraday traders, the Dolores Trading Assistant goes beyond price-based analysis by tapping into broad market internals to uncover the underlying forces driving the New York session. Whether you’re scalping, day trading, or monitoring short-term trends, this indicator helps you quickly gauge market direction, confirm momentum, and identify potential shifts—all from a single, visually accessible table. Its simplicity and focus on real-time data make it a valuable tool for traders seeking clarity in fast-moving markets.
How It Works
The indicator fetches live data from six vital market internals using a 1-second timeframe:
NYSE Advance/Decline (A/D) - Tracks the net balance of advancing versus declining NYSE stocks.
Nasdaq Advance/Decline (A/D) - Monitors the same for Nasdaq stocks.
NYSE VOLD - Measures the net volume difference between buying and selling on the NYSE.
Nasdaq VOLD - Captures the equivalent for Nasdaq.
NYSE TICK - Reflects the net number of NYSE stocks ticking up versus down.
Nasdaq TICK - Provides the same for Nasdaq.
These internals are processed to determine their trend states—such as bullish, bearish, or neutral—displayed in colors and emojis for instant recognition. The table organizes this data into three columns: the condition (e.g., "NYSE A/D"), its current reading (formatted for readability, like "1.2m" or "500k"), and its trend state (e.g., "Trending Bullish" or "Neutral"). This setup offers a snapshot of market health without overwhelming the user with excessive details.
Internal Signals and Their Role
Each internal signal contributes to understanding the market’s current state and the conditions you’re trading into:
NYSE and Nasdaq A/D: Reveals market breadth. Strong positive values suggest widespread buying, while negative readings indicate broad selling, helping you confirm if a move has robust participation.
NYSE and Nasdaq VOLD: Tracks volume momentum. High positive figures point to aggressive buying pressure, while deep negatives signal heavy selling, validating whether price moves are backed by volume.
NYSE and Nasdaq TICK: Captures short-term sentiment. Extreme readings highlight overbought or oversold conditions, offering clues about momentum strength or potential exhaustion.
How Signals Confirm Conditions
Trend States: Each internal’s trend state (e.g., "Bullish," "Bearish," "Trending Bearish") reflects its current momentum. Consistent bullish states across multiple internals confirm a strong upward trend, while bearish alignments suggest selling pressure. Neutral or mixed states indicate indecision or choppiness, guiding you to adjust expectations accordingly.
Visual Cues: Color-coded backgrounds (e.g., green for bullish, red for bearish) and emojis (e.g., 🐂for bullish, 🐻for bearish) make it easy to spot dominant conditions or emerging shifts, enhancing your ability to react quickly.
How to Use It
Add to Chart: Apply the indicator to any symbol (Best W/ SPY, QQQ, IWM and correlated futures securities) on a 1-second or higher timeframe. The table appears in your chosen position (default: bottom right).
Monitor Internals: Check the table for real-time readings and trend states. For example, "NYSE TICK: 800, Strong Overbought Rally" signals short-term bullish momentum.
Assess Conditions: Look for alignment across internals—e.g., multiple "Bullish" states suggest buying strength, while "Neutral" dominance warns of choppy action.
Adapt Your Strategy: Use the trend states to confirm entries, exits, or hold-off decisions. Pair with price tools (e.g., candlestick patterns) for a fuller picture.
Customize: Adjust table position, orientation (vertical/horizontal), text size, colors, and transparency via inputs to match your setup.
Customization
Tailor the experience with options for table placement (e.g., "Top Left"), text size (e.g., "Small" to "Huge"), orientation, and color schemes. Adjust transparency settings to keep the table unobtrusive yet readable.
Limitations
Requires real-time NYSE/Nasdaq data access, which may depend on your TradingView subscription.
Displays current conditions only, not predictive signals—use it as a real-time snapshot, not a crystal ball.
Best paired with price analysis for comprehensive trading decisions.
Requires a TradingView Subscription that supports the 1s Time Frame
Why It’s Original
The Dolores Trading Assistant stands out with its elegant, yet simple table-based presentation of NYSE and Nasdaq internals, distilled into an intuitive format with trend states and visual cues. Unlike cluttered dashboards or generic mashups, it offers a focused, trader-centric view of market momentum, avoiding unnecessary complexity while delivering actionable insights—making it a fresh and practical tool for the New York session.
FordOverview
The "Ford Trading Assistant" is an indicator crafted to support traders during the fast-paced New York trading session. This tool overlays a customizable table on your chart, delivering real-time insights from key market internals—NYSE and Nasdaq Advance/Decline (A/D), Volume Difference (VOLD), and TICK—alongside a unique Trend Score and actionable trading instructions. Its innovative design blends multiple data points into a cohesive market analysis tool, offering visual clarity and contextual guidance to help traders navigate intraday momentum shifts.
Purpose and Usefulness
Unlike typical price-based indicators, the Ford Trading Assistant taps into broad market internals to reveal underlying sentiment and momentum, making it an essential companion for intraday trading in the New York session for ETFs such as SPY/QQQ/IWM and Futures Markets(ES/NQ/RTY). It’s ideal for scalpers, day traders, and swing traders looking to confirm trend strength, spot potential reversals, or avoid choppy conditions. The indicator’s dual-table interface—one for data and signals, another for instructions—provides a streamlined way to assess current market dynamics and anticipate what’s ahead, enhancing decision-making in real time.
How It Works
The indicator pulls live data from six critical market internals using a 1-second timeframe:
NYSE Advance/Decline (A/D) - Tracks the balance of advancing versus declining NYSE stocks.
Nasdaq Advance/Decline (A/D) - Monitors the same for Nasdaq stocks.
NYSE VOLD - Measures the net volume difference between buying and selling on the NYSE.
Nasdaq VOLD - Captures the equivalent for Nasdaq.
NYSE TICK - Gauges the net number of NYSE stocks ticking up versus down.
Nasdaq TICK - Reflects the same for Nasdaq.
These internals are analyzed to determine their trend state (e.g., bullish, bearish, or neutral), displayed with color-coded backgrounds and emojis for instant recognition. The indicator then:
Assesses Trend Conditions: Evaluates the alignment of internals to identify varying degrees of bullish or bearish momentum, reflected in bar colors on the chart.
Calculates a Trend Score: Combines the strength of all internals into a single, proprietary metric that summarizes market direction and intensity.
Generates Signals: Detects changing states in market internals like reversals, acceleration, exhaustion, divergence, breakouts, and mean reversion, presented with directional cues and timestamps.
A separate instruction panel interprets these conditions, delivering guidance tailored to the market’s current state—whether it’s trending strongly, leaning one way, or stuck in divergence—helping traders understand the auction’s behavior and adjust their approach.
Internal Signals and Their Role
Each internal signal plays a distinct role in confirming the market’s current state and the conditions you’re trading into:
NYSE and Nasdaq A/D: Reflects market breadth. Strong positive readings indicate widespread buying interest, while negative readings suggest broad selling pressure, helping confirm if a move has solid participation.
NYSE and Nasdaq VOLD: Tracks volume momentum. High positive values signal aggressive buying, while deep negatives point to heavy selling, validating whether price action is supported by volume.
NYSE and Nasdaq TICK: Captures short-term sentiment. Extreme values highlight overbought or oversold conditions, offering clues about potential continuation or exhaustion.
How Signals Confirm Conditions
Trend Score: A positive score suggests bullish control, a negative score indicates bearish control, and a neutral score points to indecision. It acts as a quick gauge of overall market health with a low score of -24 and a max score of +24 with calculations based on overall internal conditions.
Reversal: Warns of potential trend shifts, triggered by significant changes in momentum or conflicting internals. Useful for exiting trends or preparing for counter-moves.
Acceleration: Highlights strengthening momentum, confirming conditions for trading a trend with confidence.
Exhaustion: Flags overextended moves, signaling fading momentum—ideal for profit-taking or fading trades.
Divergence: Indicates a disconnect between price and internals, cautioning against chasing moves that lack internal support.
Breakout: Identifies sharp momentum surges, confirming conditions for high-probability breakout trades.
Mean Reversion: Signals a pullback from extremes, suggesting a return to balance for range-bound strategies.
How to Use It
Add to Chart: Apply the indicator to any symbol (e.g., SPY, QQQ) on a 1-second or higher timeframe. It displays an "Internals Table" (default bottom right) and an "Instructions" panel (top right).
Track Internals: Watch the table for real-time data, trend states, and the Trend Score. The Bar colors also reflect the strength of bullish or bearish conditions.
Read Instructions: Use the instruction panel to understand the market’s state—e.g., "Trending Bullish" suggesting buying conditions, while "Diverging" would suggests caution.
Leverage Signals: Act on signals like "Breakout" or "Exhaustion" to enter new trades, exit old trades, manage current trades or continue to remain sidelined. Adjust table settings (position, size, colors) via inputs.
Pair with Price: Combine with your favorite price tools (e.g., support/resistance) to align internals with chart setups.
Customization
Modify the lookback period (default 100 bars), table orientation (vertical/horizontal), text size, colors, and transparency to fit your workflow.
Limitations
Requires real-time NYSE/Nasdaq data, which may depend on your TradingView plan.
Signals reflect current conditions, not future predictions, and may lag in extreme volatility.
Best used alongside price analysis for a complete trading strategy.
Requires a TradingView Subscription that supports the 1s Time Frame
Why It’s Original
The Ford Trading Assistant stands apart by integrating NYSE and Nasdaq internals into a unified, trader-friendly tool with a custom Trend Score and dynamic instructions. Rather than simply mashing up existing indicators, it offers a fresh approach to interpreting market momentum, enhanced by real-time signal detection and actionable guidance—making it a standout assistant for the New York session.

BTC Dominance Excluding StablecoinsBTC Dominance Excluding Stablecoins
Description:
The "BTC Dominance Excluding Stablecoins" indicator calculates Bitcoin's dominance as a percentage of the total cryptocurrency market capitalization, excluding the market caps of major stablecoins (USDT and USDC). Unlike the standard BTC.D ticker, which includes stablecoins in the total market cap, this indicator provides a clearer view of Bitcoin’s dominance relative to the "non-stable" crypto market. This can be useful for traders and analysts who want to assess Bitcoin’s strength without the influence of stablecoin market caps, which often skew dominance metrics during periods of high stablecoin usage.
How It Works:
Bitcoin Market Cap: Fetches Bitcoin’s market capitalization using CRYPTOCAP:BTC.
Total Market Cap: Retrieves the total cryptocurrency market cap via CRYPTOCAP:TOTAL.
Stablecoin Adjustment: Subtracts the market caps of USDT (CRYPTOCAP:USDT) and USDC (CRYPTOCAP:USDC) from the total market cap.
Dominance Calculation: Computes Bitcoin’s dominance as (BTC Market Cap / Adjusted Total Market Cap) * 100, where the adjusted total excludes stablecoins.
Output: Plots the resulting dominance percentage as a line chart.
Features:
Displays Bitcoin dominance excluding stablecoins on any timeframe.
Customizable line color and thickness for better visualization.
Provides a more accurate representation of Bitcoin’s market share in the volatile, non-stablecoin crypto ecosystem.
Usage:
Add this indicator to your TradingView chart to compare Bitcoin’s dominance against the broader altcoin market, free from stablecoin distortions. Use it alongside other indicators like BTC.D or price charts to analyze market trends, especially during periods of high stablecoin inflows or outflows.
Notes:
The indicator currently excludes USDT and USDC, the two largest stablecoins by market cap. Additional stablecoins (e.g., DAI, BUSD) can be added by modifying the script if desired.
Data is sourced from TradingView’s CRYPTOCAP symbols, which may have slight delays or variations depending on exchange data feeds.
Best used on daily or higher timeframes for smoother, more reliable results.
Author:
Created by K Du₿
Version:
Pine Script v5

50-Line Oscillator // (\_/)
// ( •.•)
// (")_(")
25-Line Oscillator
Description:
The 25-Line Oscillator is a sophisticated technical analysis tool designed to visualize market trends through the use of multiple Simple Moving Averages (SMAs). This indicator computes a series of 26 SMAs, incrementally increasing the base length, providing traders with a comprehensive view of price dynamics.
Features:
Customizable Base Length: Adjust the base length of the SMAs according to trading preferences, enhancing versatility for different market conditions.
Rainbow Effect: The indicator employs a visually appealing rainbow color scheme to differentiate between the various trend lines, making it easy to identify crossovers and momentum shifts.
Crossovers Detection: The script includes logic to detect crossover events between consecutive trend lines, which can serve as signals for potential entry or exit points in trading.
Clear Visualization: Suitable for both novice and seasoned traders, the plots enable quick interpretation of trends and market behavior.
How to Use:
Add the indicator to your chart and customize the base length as desired.
Observe the rainbow-colored lines for trend direction.
Look for crossover events between the SMAs as potential trading signals.
Application: This indicator is particularly useful for swing traders and trend followers who aim to capitalize on market momentum and identify reversals. By monitoring the behavior of multiple SMAs, traders can gain insights into the strength and direction of price movements over various time frames.

Options Chart Lite [Pt]█ Options Chart Lite
────────────────────────────
█ Introduction
Options Chart Lite is a simplified version of the full Options Chart+ tool — created for traders who want a clean and easy way to visualize option volume around price without extra complexity.
It displays live call and put volume and pricing directly on your TradingView chart, centered around the most relevant strikes for the selected expiry.
────────────────────────────
█ What Is Options Chart Lite ?
Options Chart Lite is a tool that shows real-time call and put activity in a clean, strike-by-strike table.
It provides:
- Side-by-side call/put volume and pricing
- Live table centered on current price
- Total call and put volume summary
- Quick insight into flow without overlays or clutter
────────────────────────────
█ Key Features
Visual Option Table
- Volume and price for calls and puts
- Table auto-centers around current price
- Up to 20 strikes shown
Total Volume Summary
- Call vs put volume shown at the bottom
Formatted Expiry + Timeframe
- Full expiry display (e.g. “Fri Apr 11, 2025”)
- Fixed to 1D timeframe
Reset & Warnings
- Button to reset strike range
- Optional delayed data notice
────────────────────────────
█ Inputs
Option Expiry Date (YYMMDD): Must match a valid expiry
Strike Increment: Strike spacing (e.g., 1, 2.5, 5)
Reference Strike Denominator: Rounds price to valid strike
Font Size Option: Choose Auto, Tiny, Small, or Normal
Reset Button: Re-centers if price moves
Delayed Data Warning: Toggle display of warning
────────────────────────────
█ Use Cases
Spot Key Strikes
See which strikes have the most activity.
Quick Flow Insights
Volume bias without opening an option chain.
Prep Levels
Align price action with strike flow.
Volume Skew Snapshot
Check if calls or puts dominate.
────────────────────────────
█ Known Limitations
- Invalid Expiry or Strike Inputs Will Error
Inputs must match real listed options for the symbol.
- Options Data Must Be Available
Volume will appear as 0 if TradingView data isn’t accessible.
- Strike Range is Limited
Script renders ~20 strikes. Use Reset Indicator if price moves too far.

Options Chart+ [Pt]█ Introduction
Since the launch of options data support on TradingView, the landscape for retail options traders has started to shift. But until now, no tool in the public TradingView library has offered a full-featured, visual-first interface for reading option strike activity directly from your chart.
www.tradingview.com
Options Chart+ changes that — bringing an institutional-style strike analysis interface to TradingView.
It reads the option chain for any symbol and expiry, dynamically builds a strike-by-strike volume and price table, highlights top areas of market activity, and helps you interpret directional sentiment through both total and skew-adjusted implied moves.
────────────────────────────
█ What Is Options Chart+ ?
Options Chart+ is a premium script for analyzing call and put option volumes and pricing for any option chain that's readily available on TradingView.
It provides a real-time, on-chart display of:
- Strike-Level Volume and Price Table
- Gradient Heatmaps for Volume Activity
- Overlayed Top Strikes on the Chart
- Implied Move and Directional Bias Metrics
By visualizing where options traders are concentrating their positioning, this tool helps uncover potential support/resistance zones, directional bets, and key gamma levels — all from the flow.
────────────────────────────
█ Key Features
Visual Option Chain Table
- Centers around the current price
- Real-time volume and price per strike
- Clean formatting with total summaries
Gradient Volume Coloring
- Highlights activity using customizable color gradients
- Makes volume spikes obvious at a glance
Top Strike Overlays
- Automatically highlights top volume call/put strikes
- Overlays labeled lines on the chart for price context
Implied Move and Directional Bias
- ATM straddle = Total Implied Move
- Volume-weighted extrinsics = Directional Implied Move (DIM)
- Shows skew-based bias: bullish or bearish
────────────────────────────
█ Inputs & Customization
Option Expiry Date (YYMMDD): Must match valid options for the symbol
Strike Increment: Matches strike spacing (e.g., 1, 2.5, 5)
Reference Strike Denominator: Rounds the center strike
Volume Timeframe: Any valid chart timeframe
Gradient Volume Coloring: Toggle on/off
Call/Put Volume Colors: Fully customizable
Draw Top Strike Lines: Enables chart overlays
Start / End Offset: Customize overlay length
Font Size: Auto, Tiny, Small, or Normal
Delayed Data Warning: Adds footnote in the table
Reset Button: Re-centers the tool if price moves too far
────────────────────────────
█ Use Cases
1. Spotting High-Interest Strikes
Use gradient heatmaps and overlays to see where volume is clustering.
Example: Heavy calls at 4200 may act as a magnet or gamma level — perfect for breakout or fade setups.
2. Interpreting Sentiment with DIM
Gauge where the flow is leaning directionally.
Example: Bullish DIM = call extrinsics outweigh puts → sentiment skewed bullish.
3. Sizing Risk Around Implied Movement
Use Total Implied Move to set range boundaries.
Example: Avoid selling premium inside the expected move unless risk is tight.
4. Combining Volume and Price Action
Overlay strikes with price structure for confluence trades.
Example: A heavy put strike with price holding = potential bounce zone.
5. Structuring Straddles or Strangles
Use volume skew to inform multi-leg positions.
Example: If call side is bid up, lean strangle wider to the upside.
────────────────────────────
█ Known Limitations
- Invalid Expiry or Strike Inputs Will Error
You are responsible for selecting a valid expiry and strike increment that matches the symbol’s listed options.
- Options Data Must Be Available
This tool depends on TradingView's options feed. If you do not have access (delayed or real-time), the script will fail to load.
- Strike Range is Limited
Renders ~20 strikes max to preserve clarity. If price moves beyond that, use the Reset Indicator input.
────────────────────────────
█ Final Thoughts
Options Chart+ is built for traders who operate on flow, structure, and sentiment. It lets you trade with confidence by showing where the real positioning is happening — visually, clearly, and in real-time.
If you:
- Think in terms of option flow
- Trade around volume levels or gamma exposure
- Want faster access to skew and sentiment
- Or just need clarity over chaos in an options chain...
This tool is for you.

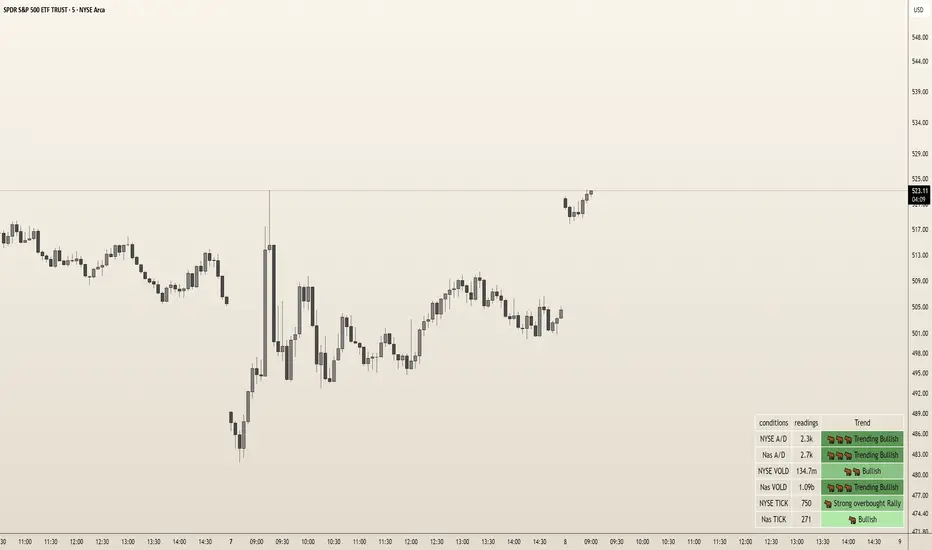
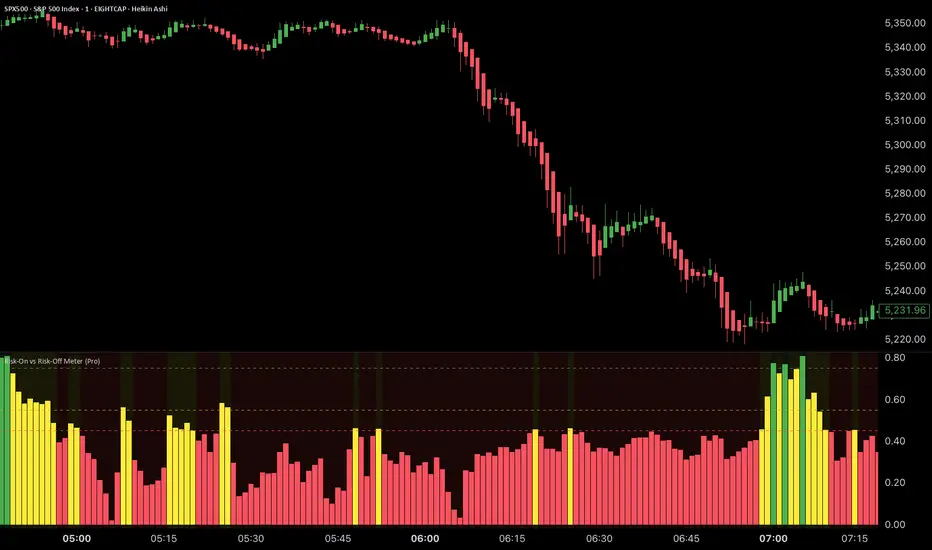
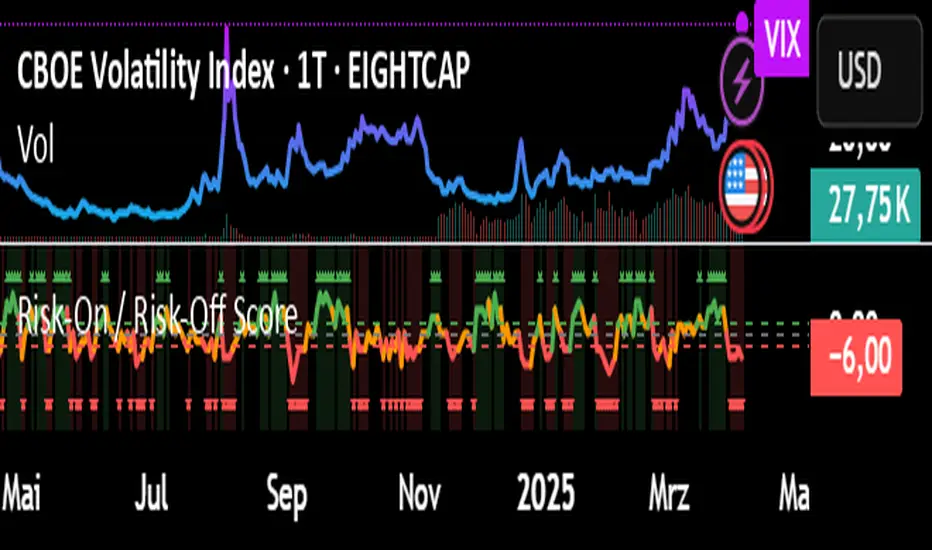
Risk-On vs Risk-Off Meter (Pro)Risk-On vs Risk-Off Meter (Pro)
This macro-based tool analyzes capital flows across key assets to gauge overall market risk sentiment. It does not use ES, SPY, or stock data directly—making it a powerful confirmation tool for ES traders looking to align with macro forces.
🔹 Core Idea:
Tracks capital rotation between copper/gold, bonds, dollar, crude oil, VIX, and yield spreads to generate a normalized risk score (0–1). This score reflects whether macro money is flowing into risk or safety.
🔹 Use:
Use this indicator as confirmation of directional bias when scalping or day trading ES.
– Green Zone (>0.75): Risk-On environment. Favor long setups.
– Red Zone (<0.45): Risk-Off. Favor short setups or stand aside.
– Yellow Zone: Neutral, use caution.
– Divergence Alerts: Signals when ES price disagrees with macro risk trend—potential reversals or exhaustion zones.
HOT TO USE
– Combine with your existing price action or order flow signals
– Avoid trading against the macro sentiment unless strong setup
– Use divergence as a heads-up for fading or exiting trades
This gives you a macro-informed lens to validate or filter your entries.
Risk-On / Risk-Off ScoreRisk-On / Risk-Off Score (Macro Sentiment Indicator)
This indicator calculates a custom Risk-On / Risk-Off Score to objectively assess the current market risk sentiment using a carefully selected basket of macroeconomic assets and intermarket relationships.
🧠 What does this indicator do?
The score is based on 14 key components grouped into three categories:
🟢 Risk-On Assets (rising = appetite for risk)
(+1 if performance over X days is positive, otherwise –1)
NASDAQ 100 (NAS100USD)
S&P 500 (SPX)
Bitcoin (BTCUSD)
Copper (HG1!)
WTI Crude Oil (CLK2025)
🔴 Risk-Off Assets (rising = flight to safety)
(–1 if performance is positive, otherwise +1)
Gold (XAUUSD)
US Treasury Bonds (TLT ETF) (TLT)
US Dollar Index (DXY)
USD/CHF
USD/JPY
US 10Y Yields (US10Y) (yields are interpreted inversely)
⚖️ Risk Spreads / Relative Indicators
(+1 if rising, –1 if falling)
Copper/Gold Ratio → HG1! / XAUUSD
NASDAQ/VIX Ratio → NAS100USD / VIX
HYG/TLT Ratio → HYG / TLT
📏 Score Calculation
Total score = sum of all components
Range: from –14 (extreme Risk-Off) to +14 (strong Risk-On)
Color-coded output:
🟢 Score > 2 = Risk-On
🟠 –2 to +2 = Neutral
🔴 Score < –2 = Risk-Off
Displayed as a line plot with background color and signal markers
🧪 Timeframe of analysis:
Default: 5 days (adjustable via input)
Calculated using Rate of Change (% change)
🧭 Use Cases:
Quickly assess macro sentiment
Filter for position sizing, hedging, or intraday bias
Especially useful for:
Swing traders
Day traders with macro filters
Volatility and options traders
📌 Note:
This is not a buy/sell signal indicator, but a contextual sentiment tool designed to help you stay aligned with overall market conditions.
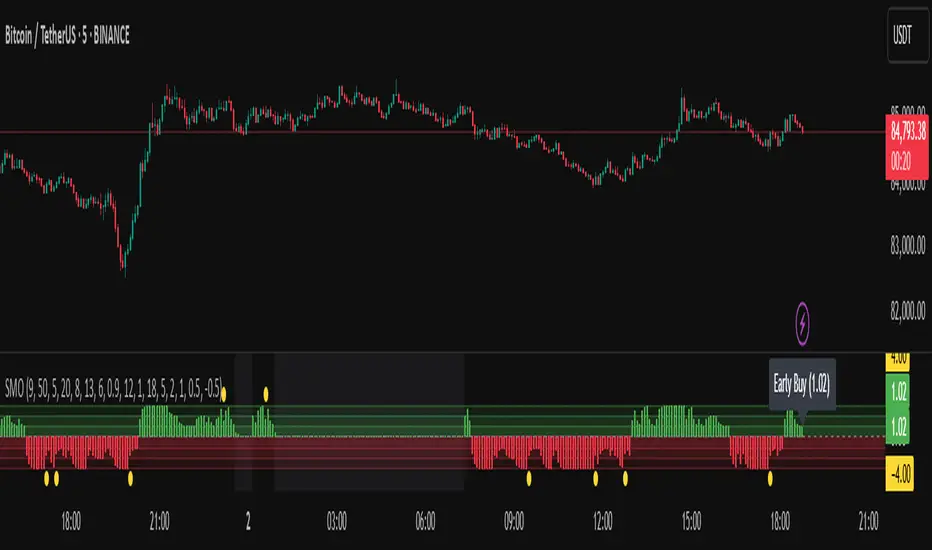
Sentiment Master Oscillator[BullByte]
The Sentiment Master Oscillator is a modern market sentiment indicator designed for traders seeking to identify early trend shifts and potential reversals with clarity. This oscillator combines multiple technical tools—RSI, MACD, EMAs, ADX, ATR, and volume filters—to deliver layered signals that help you assess market momentum in a clear and simplified manner.
Key Features:
- Multi-Indicator Approach :
Integrates RSI (with a smoothing function), MACD, and two EMAs to gauge momentum and trend direction. The oscillator also includes ADX and ATR filters to ensure that only markets with sufficient directional strength and volatility generate signals.
- Dynamic Signal Zones :
The oscillator produces a raw value ranging roughly from -3 to +3 (adjustable via a scaling factor). Positive readings suggest bullish conditions, while negative readings indicate bearish trends. Visual zones (Early, Confirmed, Strong) are clearly marked with color-coded horizontal lines to help you interpret the strength of the signal at a glance.
- Adaptive Smoothing :
For those who prefer quicker, more responsive signals (ideal for scalping), an adaptive smoothing option is available. When enabled, it applies a shorter smoothing period to the oscillator; otherwise, a more conservative base period is used.
- Reversal Alerts :
Yellow dots are plotted on the chart to highlight potential reversal points. These alerts are triggered when the oscillator crosses specific thresholds, coupled with volume and ATR conditions, signaling that a top or bottom may be forming.
- Customizable Filters :
- ATR Filter :Ensures that the market's volatility is above a set threshold before signaling.
- ADX Filter :Confirms sufficient trend strength.
- Volume Filter : Requires that trading volume surges above a multiple of its simple moving average, filtering out low-volume noise.
- Clear Signal Messaging :
Based on the combined signals from various indicators, the script categorizes market sentiment into actionable messages such as "Early Buy", "Confirmed Buy", "Strong Buy", "Early Sell", "Confirmed Sell", and "Strong Sell". A "Grey Zone" label is used when the oscillator is near neutral, indicating that no clear trend is present.
How to Use :
1. Entry and Exit Decisions : Use the different signal stages (Early, Confirmed, Strong) as guides for your entries and exits.
2. Trend Confirmation : Rely on the multi-indicator setup for added confirmation of prevailing market conditions before executing trades.
3. Reversal Cues : Pay attention to the reversal dots for potential turning points in the market, which can be used to adjust positions or initiate trades.
Disclaimer:
This indicator is intended for educational and informational purposes only. It should not be taken as financial advice. Always use appropriate risk management and combine it with your analysis before making any trading decisions. Past performance is not indicative of future results.
By adhering to TradingView's publishing guidelines, the BullByte Sentiment Master is designed to provide transparency, simplicity, and robust analysis tools to enhance your trading strategy. Enjoy a clearer view of market sentiment and make more informed trading decisions!