PROTECTED SOURCE SCRIPT
Cập nhật Trend and Bands Visualizer
# Trend and Bands Visualizer (TBV)
## Closed Source - Publication Description
---
# ENGLISH EXPLANATION
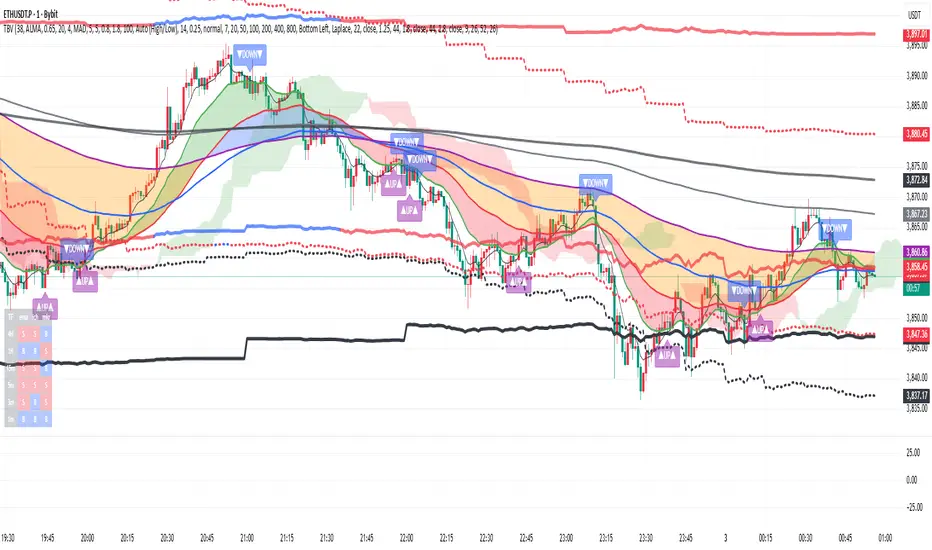
## 📊 Trend and Bands Visualizer (TBV)
**A comprehensive multi-timeframe analysis tool combining volatility-based trend detection with advanced technical indicators for educational market analysis.**
---
## 🎯 COMPLETE FEATURE LIST
### VWC (Volatility Weighted Cloud) Component
- ✅ Adaptive volatility-based trend detection
- ✅ Dynamic ALMA/EMA calculation with smoothing
- ✅ Automatic bar coloring based on trend direction
- ✅ Adaptive bands that adjust to market volatility
- ✅ Trend switch detection with visual labels
- ✅ Customizable label positioning and sizing
- ✅ Real-time trend status monitoring
### TBOSI (Trend, Bands, and Signal Indicator) Component
- ✅ Multi-timeframe EMA analysis (7 EMAs: 7, 20, 50, 100, 200, 400, 800)
- ✅ EMA crossover detection and visualization
- ✅ Color-coded EMA fills showing trend strength
- ✅ Ichimoku Cloud integration for trend confirmation
- ✅ MKR (Mean Reversion Bands) across 6 timeframes (1m, 3m, 5m, 15m, 1H, 4H)
- ✅ Non-repainting multi-timeframe calculations
- ✅ Bollinger Bands for 15m and 60m timeframes
- ✅ Comprehensive status table showing all timeframes
### Visual Display Features
- ✅ Color-coded bar coloring (Purple=Bullish, Blue=Bearish)
- ✅ Trend switch labels (UP/DOWN) with automatic positioning
- ✅ Multi-timeframe status table with customizable position
- ✅ Transparent overlay design for clear price action visibility
- ✅ Adjustable colors and transparency levels
- ✅ Scalable label sizes for different screen resolutions
### Alert System
- ✅ VWC trend switch alerts (UP/DOWN)
- ✅ MKR band crossing alerts for 15m timeframe
- ✅ MKR band crossing alerts for 1H timeframe
- ✅ MKR band crossing alerts for 4H timeframe
- ✅ Customizable alert messages with price levels
- ✅ Non-repainting alert triggers
### Customization Options
- ✅ Over 30 adjustable input parameters
- ✅ Enable/disable VWC and TBOSI independently
- ✅ Adjustable EMA lengths for all 7 moving averages
- ✅ Customizable Ichimoku parameters (Tenkan, Kijun, Senkou)
- ✅ Adjustable MKR band sensitivity (lookback, deviation)
- ✅ Flexible table positioning (6 positions available)
- ✅ Customizable label anchor points and offsets
- ✅ Color customization for all visual elements
---
## 📖 FEATURES AND USAGE GUIDE
### 1. VWC (Volatility Weighted Cloud)
**What It Does:**
VWC analyzes price volatility and trend direction to provide adaptive trend signals. It uses either ALMA (Arnaud Legoux Moving Average) or EMA with volatility-based adjustments to identify trend changes.
**Key Features:**
- **Adaptive Volatility Calculation**: Automatically adjusts to changing market conditions using StDev or MAD (Median Absolute Deviation)
- **Dynamic Bands**: Upper and lower bands expand and contract based on volatility percentile ranking
- **Trend Detection**: Identifies trend changes when price crosses the adaptive bands
- **Bar Coloring**: Visual representation of current trend (Purple=Bullish, Blue=Bearish)
**How to Use:**
1. **Enable VWC** from the settings panel
2. **Adjust Basis Length** (default: 38) - Lower values = more responsive, Higher values = smoother trends
3. **Choose Basis Type**:
- ALMA: Better for smooth trends, less noise
- EMA: Faster response to price changes
4. **Set Volatility Method**:
- StDev: Standard statistical approach
- MAD: More robust to outliers
5. **Adjust Multipliers**: Control band width (Min: 0.8, Max: 1.8)
6. **Watch for Trend Switch Labels**: UP▲ (bullish) or DOWN▼ (bearish) signals
**Best For:**
- Identifying primary trend direction
- Finding potential trend reversal points
- Visual confirmation of market bias
- Entry timing in trending markets
---
### 2. TBOSI Multi-Timeframe EMA Analysis
**What It Does:**
Displays and analyzes 7 exponential moving averages across multiple timeframes to identify trend alignment and potential support/resistance zones.
**Key Features:**
- **7 EMAs Simultaneously**: EMA7, EMA20, EMA50, EMA100, EMA200, EMA400, EMA800
- **EMA Fills**: Color-coded areas between EMAs show trend strength
- Blue fill: Bullish alignment (shorter EMA above longer EMA)
- Orange fill: Bearish alignment (shorter EMA below longer EMA)
- **Multi-Timeframe View**: Each timeframe's EMA status shown in status table
**How to Use:**
1. **Enable TBOSI** and **Show EMA Lines** from settings
2. **Enable EMA Fills** to see trend strength visualization
3. **Customize EMA Lengths** if needed for your trading style
4. **Watch for EMA Crossovers**:
- EMA7 crossing EMA20: Short-term trend change
- EMA20 crossing EMA50: Medium-term trend change
- EMA50 crossing EMA200: Long-term trend change
5. **Check Status Table**: Verify multi-timeframe alignment
- Blue = Bullish (EMA20 > EMA50)
- Red = Bearish (EMA20 < EMA50)
**Best For:**
- Confirming trend direction across timeframes
- Identifying dynamic support/resistance levels
- Spotting trend exhaustion (EMA compression)
- Multi-timeframe confluence analysis
---
### 3. Ichimoku Cloud Integration
**What It Does:**
Displays Ichimoku Cloud with leading spans to provide additional trend confirmation and identify key support/resistance zones.
**Key Features:**
- **Leading Span A & B**: Forward-projected cloud shows future support/resistance
- **Cloud Color**: Green (bullish) or Red (bearish) based on span relationship
- **Displacement**: Shows future price bias
- **Multi-Timeframe**: Cloud status for all monitored timeframes
**How to Use:**
1. **Enable Ichimoku Cloud Display** from settings
2. **Adjust Parameters** if needed:
- Tenkan (Conversion Line): Default 9
- Kijun (Base Line): Default 26
- Senkou Span B: Default 52
- Displacement: Default 26
3. **Interpret the Cloud**:
- Price above cloud: Bullish bias
- Price below cloud: Bearish bias
- Price in cloud: Neutral/transition
- Thick cloud: Strong support/resistance
- Thin cloud: Weak support/resistance
4. **Check Status Table**: See cloud color (B/S/N) for each timeframe
**Best For:**
- Additional trend confirmation
- Identifying future support/resistance zones
- Spotting equilibrium areas (transition zones)
- Long-term trend analysis
---
### 4. MKR (Mean Reversion Bands)
**What It Does:**
MKR Bands are statistical bands that identify potential overextension points where price may revert to the mean. Calculated across 6 timeframes for comprehensive analysis.
**Key Features:**
- **6 Timeframes**: 1m, 3m, 5m, 15m, 1H, 4H
- **Non-Repainting**: Uses confirmed bar data only
- **Dynamic Bands**: Adjust based on selected kernel and bandwidth
- **Color-Coded**: Blue (price above mean), Red (price below mean)
- **Cross Detection**: Identifies when price crosses upper or lower bands
**How to Use:**
1. **Enable NRP (Non-Repaint) Display** from settings
2. **Adjust Bandwidth** (default: 8) - Controls band sensitivity
3. **Set Deviations** (default: 6) - Controls band width
4. **Select Kernel Type** for calculation method:
- Gaussian: Smooth, balanced
- Epanechnikov: More responsive
- Other options for specific characteristics
5. **Watch for Band Crosses**:
- Cross above upper band: Potential overbought
- Cross below lower band: Potential oversold
- Cross back through bands: Mean reversion signal
6. **Check Status Table**: MKR column shows B/S status
**Best For:**
- Identifying overextended price moves
- Mean reversion trading strategies
- Confluence with trend signals
- Risk management (avoid extremes)
---
### 5. Bollinger Bands (15m & 60m)
**What It Does:**
Displays Bollinger Bands from 15-minute and 60-minute timeframes to identify volatility and potential reversal zones.
**Key Features:**
- **15m Bands**: Dotted lines (linewidth 3) - Short-term volatility
- **60m Bands**: Solid lines (linewidth 4) - Medium-term volatility
- **Dynamic Width**: Expands in high volatility, contracts in low volatility
**How to Use:**
1. **Enable 15m BB Display** and/or **60m BB Display** from settings
2. **Watch for Squeeze**: When bands contract (low volatility)
- Often precedes significant moves
3. **Watch for Expansion**: When bands widen (high volatility)
- Indicates active trending market
4. **Price at Bands**:
- At upper band: Potential resistance, overbought
- At lower band: Potential support, oversold
5. **Multiple Timeframe View**: Compare 15m and 60m bands for confluence
**Best For:**
- Volatility assessment
- Breakout trading (squeezes)
- Reversal trading (band touches)
- Multi-timeframe confirmation
---
### 6. Status Table
**What It Does:**
Displays a comprehensive overview of trend direction across all monitored timeframes in a single, easy-to-read table.
**Key Features:**
- **4H Timeframe Row**: 240m data (EMA, Ichimoku, MKR status)
- **1H Timeframe Row**: 60m data
- **15m Timeframe Row**: 15m data
- **5m Timeframe Row**: 5m data
- **3m Timeframe Row**: 3m data
- **1m Timeframe Row**: 1m data
- **Color-Coded Cells**:
- Blue background: Bullish
- Red background: Bearish
- Gray background: Neutral
**How to Use:**
1. **Position the Table**: Choose from 6 positions
- Top Left, Top Right
- Middle Left, Middle Right
- Bottom Left, Bottom Right (default)
2. **Adjust Table Size**: Small, Normal (default), or Large
3. **Read the Columns**:
- **TF**: Timeframe
- **ema**: EMA trend (EMA20 vs EMA50)
- **ich**: Ichimoku Cloud color
- **mkr**: MKR band status
4. **Look for Alignment**:
- All blue across timeframes: Strong bullish trend
- All red across timeframes: Strong bearish trend
- Mixed colors: Choppy or transitional market
5. **Use for Confluence**:
- More aligned timeframes = stronger signal
- Look for transitions (colors changing)
**Best For:**
- Quick market overview
- Multi-timeframe confluence check
- Identifying trend strength
- Spotting divergences between timeframes
---
### 7. Alert System
**What It Does:**
Provides customizable alerts for key events including trend switches and band crossings.
**Available Alerts:**
1. **VWC UP Signal**: When trend switches from bearish to bullish
2. **VWC DOWN Signal**: When trend switches from bullish to bearish
3. **15m MKR Upper Band Cross Over**: Price crosses above 15m MKR upper band
4. **15m MKR Lower Band Cross Over**: Price crosses above 15m MKR lower band
5. **15m MKR Upper Band Cross Under**: Price crosses below 15m MKR upper band
6. **15m MKR Lower Band Cross Under**: Price crosses below 15m MKR lower band
7. **60m MKR Band Crosses**: Same as above for 1H timeframe (4 alerts)
8. **60m MKR Band Touch**: Any touch of 60m upper or lower band (2 alerts)
9. **240m MKR Band Crosses**: Same as 15m for 4H timeframe (4 alerts)
**How to Use:**
1. **Click Alert Icon** on TradingView toolbar
2. **Select Condition**: Choose from alert list
3. **Configure Alert**:
- Frequency: Once per bar close (recommended)
- Expiration: Set as needed
- Alert actions: Popup, Email, Webhook, etc.
4. **Customize Message**: Default messages include price levels
5. **Create Alert**: Click "Create"
**Alert Best Practices:**
- Use "Once Per Bar Close" to avoid repainting
- Set up multiple alerts for different timeframes
- Combine trend switch alerts with band cross alerts
- Test alerts in paper trading first
- Don't rely solely on alerts - always verify visually
**Best For:**
- Real-time monitoring without watching charts
- Catching trend changes early
- Identifying reversal opportunities
- Multi-tasking while trading
---
## ⚙️ RECOMMENDED SETTINGS BY TRADING STYLE
### Scalping (1-5 minute trades)
```
VWC:
- Basis Length: 20-30 (faster response)
- Basis Type: EMA
- Volatility Method: StDev
- Min/Max Multiplier: 0.6 / 1.5
TBOSI:
- Focus on 1m, 3m, 5m timeframes
- Enable 15m MKR bands
- Table position: Top Right
- Enable fast alerts (15m MKR)
```
### Day Trading (15m - 4H holds)
```
VWC:
- Basis Length: 38 (default)
- Basis Type: ALMA
- Volatility Method: MAD
- Min/Max Multiplier: 0.8 / 1.8
TBOSI:
- Focus on 15m, 1H, 4H timeframes
- Enable 15m and 60m Bollinger Bands
- Table position: Bottom Left
- Enable 60m MKR alerts
```
### Swing Trading (Daily charts)
```
VWC:
- Basis Length: 50-75 (smoother trends)
- Basis Type: ALMA
- Volatility Method: MAD
- Min/Max Multiplier: 1.0 / 2.0
TBOSI:
- Focus on 4H, Daily timeframes
- Use longer EMAs (200, 400, 800)
- Enable Ichimoku Cloud
- Enable 240m MKR alerts
```
---
## 📱 QUICK START GUIDE
### Step 1: Add to Chart
1. Search for "Trend and Bands Visualizer" in TradingView indicators
2. Add to your chart
3. **Important**: Set "Pin to right scale" in indicator settings
### Step 2: Configure Basic Settings
1. **Enable Components**: Turn on VWC and/or TBOSI
2. **Enable Bar Coloring**: For visual trend identification
3. **Enable Status Table**: For multi-timeframe view
4. **Position Table**: Choose your preferred location
### Step 3: Customize Display
1. **Adjust Label Size**: Normal (default) or larger for visibility
2. **Enable/Disable EMA Lines**: Based on chart clarity
3. **Enable EMA Fills**: For visual trend strength
4. **Enable Bollinger Bands**: If using breakout strategies
### Step 4: Set Up Alerts
1. Create alert for VWC trend switches
2. Create alerts for key MKR band crosses
3. Set appropriate alert actions (email, popup, etc.)
### Step 5: Start Analyzing
1. Check bar colors for immediate trend bias
2. Look for trend switch labels (UP/DOWN)
3. Verify with status table for multi-timeframe confirmation
4. Wait for alerts for new opportunities
---
## 💡 TRADING STRATEGIES & EXAMPLES
### Strategy 1: Trend Following with Multi-Timeframe Confirmation
**Setup:**
- VWC shows clear trend (solid bar colors)
- Status table shows 3+ timeframes aligned (all blue or all red)
- Price respects EMA structure (above EMAs in uptrend, below in downtrend)
**Entry:**
- Wait for VWC trend switch label (UP or DOWN)
- Verify multi-timeframe alignment in status table
- Enter on pullback to EMA20 or EMA50
- Set stop below recent swing low (for longs) or above swing high (for shorts)
**Exit:**
- Opposite VWC trend switch label
- MKR band extreme touch with reversal
- Target: 1:2 or 1:3 risk-reward ratio
---
### Strategy 2: Mean Reversion with MKR Bands
**Setup:**
- Price touches or crosses MKR band (15m or 60m)
- Opposite timeframes show no strong trend (mixed colors in table)
- Looking for reversion to mean
**Entry:**
- Price crosses back through MKR band toward mean
- Wait for confirmation bar
- Enter with tight stop beyond band
**Exit:**
- Price reaches opposite MKR band
- Price reaches moving average cluster
- Fixed profit target or trailing stop
---
### Strategy 3: Breakout Trading with Bollinger Bands
**Setup:**
- Bollinger Bands showing squeeze (narrow width)
- Price consolidating near bands
- Volume decreasing
**Entry:**
- Price breaks out of Bollinger Band
- VWC confirms direction with bar color
- Status table shows emerging alignment
- Enter on breakout bar or pullback
**Exit:**
- Bollinger Bands show extreme expansion
- VWC trend switch signal
- Price reaches Bollinger Band on opposite side
---
## ⚠️ IMPORTANT NOTES & LIMITATIONS
### What This Indicator Does:
✅ Provides multi-timeframe trend analysis
✅ Identifies potential trend changes
✅ Shows volatility and momentum conditions
✅ Offers visual and alert-based notifications
✅ Helps with multi-timeframe confluence
### What This Indicator Does NOT Do:
❌ Predict future price movements with certainty
❌ Guarantee profitable trades
❌ Replace proper risk management
❌ Work equally well in all market conditions
❌ Eliminate the need for price action analysis
### Best Used When:
✅ Markets have clear trends or ranges
✅ Sufficient liquidity exists
✅ Combined with proper risk management
✅ Used alongside volume analysis
✅ Trader understands the underlying concepts
### Less Effective When:
❌ Markets are extremely choppy
❌ News events cause irregular price action
❌ Very low liquidity conditions
❌ Used as sole decision-making tool
❌ Settings not adjusted for asset characteristics
---
## 🎓 EDUCATIONAL VALUE
This indicator is designed as an educational tool to help traders:
- Understand trend dynamics across multiple timeframes
- Learn about volatility and its impact on trading
- Practice multi-timeframe analysis
- Develop systematic approaches to market analysis
- Improve timing and entry/exit decisions
**Remember**: No indicator is perfect. Always combine technical analysis with fundamental analysis, risk management, and proper position sizing.
---
## 📊 TECHNICAL SPECIFICATIONS
- **Pine Script Version**: 6
- **Chart Type**: Overlay indicator
- **Calculations**: Real-time, non-repainting
- **Security Calls**: Properly implemented with confirmed bar data
- **Maximum Lookback**: 5000 bars
- **Performance**: Optimized for minimal lag
- **Compatibility**: Works on all TradingView plans
- **Timeframes**: Works on all timeframes (tick to monthly)
- **Assets**: Stocks, Forex, Crypto, Futures, Indices
---
## ⚠️ DISCLAIMER
**IMPORTANT - PLEASE READ**
This indicator is provided for **educational and informational purposes only**. It is not financial advice, investment advice, trading advice, or a recommendation to buy or sell any financial instrument.
**Risk Warning:**
- Trading financial instruments involves substantial risk of loss
- Past performance is not indicative of future results
- You may lose all or more than your initial investment
- Only trade with capital you can afford to lose
- No trading system or indicator is 100% accurate
**User Responsibility:**
- You are solely responsible for your trading decisions
- Always conduct your own research and analysis
- Consult with qualified financial advisors
- Understand the risks before trading
- Use proper risk management at all times
**No Guarantees:**
- No guarantee of profits or success
- No guarantee of accuracy or performance
- Results may vary significantly between users
- Market conditions constantly change
By using this indicator, you acknowledge that you understand these risks and accept full responsibility for your trading decisions.
---
## 📞 SUPPORT & UPDATES
- **Updates**: Bug fixes and improvements will be released as needed
- **Questions**: Use TradingView comments for technical questions
- **Feedback**: Constructive feedback is welcome and appreciated
---
## 📜 LICENSE
This indicator is closed source and proprietary. All rights reserved.
---
---
# 日本語版
## 📊 トレンド&バンド ビジュアライザー (TBV)
**ボラティリティベースのトレンド検出と高度なテクニカル指標を組み合わせた、包括的なマルチタイムフレーム分析ツール(教育用)**
---
## 🎯 全機能リスト
### VWC(ボラティリティ加重クラウド)コンポーネント
- ✅ 適応型ボラティリティベースのトレンド検出
- ✅ スムージング機能付き動的ALMA/EMA計算
- ✅ トレンド方向に基づく自動バー着色
- ✅ 市場のボラティリティに適応する動的バンド
- ✅ 視覚的ラベルによるトレンド転換検出
- ✅ カスタマイズ可能なラベル位置とサイズ
- ✅ リアルタイムトレンドステータス監視
### TBOSI(トレンド、バンド、シグナルインジケーター)コンポーネント
- ✅ マルチタイムフレームEMA分析(7本:7, 20, 50, 100, 200, 400, 800)
- ✅ EMAクロスオーバー検出と可視化
- ✅ トレンド強度を示す色分けEMA塗りつぶし
- ✅ トレンド確認のための一目均衡表統合
- ✅ 6つの時間軸(1分、3分、5分、15分、1時間、4時間)のMKR(平均回帰バンド)
- ✅ リペイントしないマルチタイムフレーム計算
- ✅ 15分と60分の時間軸用ボリンジャーバンド
- ✅ 全時間軸を表示する包括的ステータステーブル
### ビジュアル表示機能
- ✅ 色分けバー着色(紫=強気、青=弱気)
- ✅ 自動配置されるトレンド転換ラベル(UP/DOWN)
- ✅ カスタマイズ可能な位置のマルチタイムフレームステータステーブル
- ✅ 価格アクションが見やすい透明オーバーレイデザイン
- ✅ 調整可能な色と透明度レベル
- ✅ 異なる画面解像度用のスケーラブルなラベルサイズ
### アラートシステム
- ✅ VWCトレンド転換アラート(UP/DOWN)
- ✅ 15分足MKRバンドクロスアラート
- ✅ 1時間足MKRバンドクロスアラート
- ✅ 4時間足MKRバンドクロスアラート
- ✅ 価格レベルを含むカスタマイズ可能なアラートメッセージ
- ✅ リペイントしないアラートトリガー
### カスタマイズオプション
- ✅ 30以上の調整可能な入力パラメータ
- ✅ VWCとTBOSIを個別に有効/無効化
- ✅ 全7本の移動平均の調整可能な期間
- ✅ カスタマイズ可能な一目均衡表パラメータ(転換線、基準線、先行スパン)
- ✅ 調整可能なMKRバンド感度(ルックバック、偏差)
- ✅ 柔軟なテーブル配置(6つの位置が利用可能)
- ✅ カスタマイズ可能なラベルアンカーポイントとオフセット
- ✅ すべての視覚要素の色カスタマイズ
---
## 📖 機能と使用方法ガイド
### 1. VWC(ボラティリティ加重クラウド)
**機能説明:**
VWCは価格のボラティリティとトレンド方向を分析し、適応型トレンドシグナルを提供します。ALMA(Arnaud Legoux移動平均)またはEMAをボラティリティベースの調整と組み合わせて使用し、トレンドの変化を識別します。
**主な機能:**
- **適応型ボラティリティ計算**:StDevまたはMAD(中央絶対偏差)を使用して市場状況の変化に自動的に適応
- **動的バンド**:上限バンドと下限バンドがボラティリティパーセンタイルランキングに基づいて拡大・縮小
- **トレンド検出**:価格が適応バンドを交差したときにトレンド変化を識別
- **バー着色**:現在のトレンドの視覚的表現(紫=強気、青=弱気)
**使用方法:**
1. **VWCを有効化**:設定パネルから有効にする
2. **ベース長を調整**(デフォルト:38):低い値 = より敏感、高い値 = よりスムーズなトレンド
3. **ベースタイプを選択**:
- ALMA:スムーズなトレンドに適しており、ノイズが少ない
- EMA:価格変化への反応が速い
4. **ボラティリティ方法を設定**:
- StDev:標準的な統計アプローチ
- MAD:外れ値に対してより堅牢
5. **乗数を調整**:バンド幅を制御(最小:0.8、最大:1.8)
6. **トレンド転換ラベルを監視**:UP▲(強気)またはDOWN▼(弱気)シグナル
**最適な用途:**
- 主要なトレンド方向の特定
- 潜在的なトレンド反転ポイントの発見
- 市場バイアスの視覚的確認
- トレンド市場でのエントリータイミング
---
### 2. TBOSIマルチタイムフレームEMA分析
**機能説明:**
複数の時間軸にわたって7本の指数移動平均を表示・分析し、トレンドの整合性と潜在的なサポート/レジスタンスゾーンを識別します。
**主な機能:**
- **7本のEMAを同時表示**:EMA7、EMA20、EMA50、EMA100、EMA200、EMA400、EMA800
- **EMA塗りつぶし**:EMA間の色分けされたエリアがトレンド強度を示す
- 青色の塗りつぶし:強気の整列(短期EMAが長期EMAの上)
- オレンジ色の塗りつぶし:弱気の整列(短期EMAが長期EMAの下)
- **マルチタイムフレームビュー**:各時間軸のEMAステータスがステータステーブルに表示
**使用方法:**
1. **TBOSIを有効化**し、**EMAラインを表示**を設定から有効にする
2. **EMA塗りつぶしを有効化**してトレンド強度の可視化を表示
3. 必要に応じて**EMA期間をカスタマイズ**
4. **EMAクロスオーバーを監視**:
- EMA7がEMA20をクロス:短期トレンド変化
- EMA20がEMA50をクロス:中期トレンド変化
- EMA50がEMA200をクロス:長期トレンド変化
5. **ステータステーブルを確認**:マルチタイムフレームの整合性を検証
- 青 = 強気(EMA20 > EMA50)
- 赤 = 弱気(EMA20 < EMA50)
**最適な用途:**
- 時間軸を超えたトレンド方向の確認
- 動的なサポート/レジスタンスレベルの特定
- トレンド疲弊の発見(EMAの圧縮)
- マルチタイムフレームコンフルエンス分析
---
### 3. 一目均衡表統合
**機能説明:**
先行スパンを持つ一目均衡表を表示し、追加のトレンド確認と主要なサポート/レジスタンスゾーンを識別します。
**主な機能:**
- **先行スパンA & B**:将来のサポート/レジスタンスを示す前方投影された雲
- **雲の色**:スパンの関係に基づいて緑(強気)または赤(弱気)
- **変位**:将来の価格バイアスを示す
- **マルチタイムフレーム**:監視されているすべての時間軸の雲の状態
**使用方法:**
1. **一目均衡表の表示を有効化**:設定から有効にする
2. 必要に応じて**パラメータを調整**:
- 転換線:デフォルト 9
- 基準線:デフォルト 26
- 先行スパンB:デフォルト 52
- 変位:デフォルト 26
3. **雲を解釈**:
- 価格が雲の上:強気バイアス
- 価格が雲の下:弱気バイアス
- 価格が雲の中:中立/移行期
- 厚い雲:強いサポート/レジスタンス
- 薄い雲:弱いサポート/レジスタンス
4. **ステータステーブルを確認**:各時間軸の雲の色(B/S/N)を確認
**最適な用途:**
- 追加のトレンド確認
- 将来のサポート/レジスタンスゾーンの特定
- 均衡エリア(移行ゾーン)の発見
- 長期トレンド分析
---
### 4. MKR(平均回帰バンド)
**機能説明:**
MKRバンドは、価格が平均に回帰する可能性のある過剰延長ポイントを識別する統計的バンドです。包括的な分析のために6つの時間軸で計算されます。
**主な機能:**
- **6つの時間軸**:1分、3分、5分、15分、1時間、4時間
- **リペイントなし**:確定バーデータのみを使用
- **動的バンド**:選択されたカーネルとバンド幅に基づいて調整
- **色分け**:青(価格が平均より上)、赤(価格が平均より下)
- **クロス検出**:価格が上限または下限バンドをクロスしたときを識別
**使用方法:**
1. **NRP(リペイントなし)表示を有効化**:設定から有効にする
2. **バンド幅を調整**(デフォルト:8):バンドの感度を制御
3. **偏差を設定**(デフォルト:6):バンドの幅を制御
4. 計算方法の**カーネルタイプを選択**:
- ガウシアン:スムーズでバランスが良い
- エパネチニコフ:より反応的
- その他の特定の特性用オプション
5. **バンドクロスを監視**:
- 上限バンドの上にクロス:潜在的な買われ過ぎ
- 下限バンドの下にクロス:潜在的な売られ過ぎ
- バンドを通過して戻る:平均回帰シグナル
6. **ステータステーブルを確認**:MKR列がB/Sステータスを表示
**最適な用途:**
- 過剰延長された価格動きの識別
- 平均回帰トレーディング戦略
- トレンドシグナルとのコンフルエンス
- リスク管理(極端な状況を避ける)
---
### 5. ボリンジャーバンド(15分 & 60分)
**機能説明:**
15分足と60分足のボリンジャーバンドを表示し、ボラティリティと潜在的な反転ゾーンを識別します。
**主な機能:**
- **15分バンド**:点線(線幅3)- 短期ボラティリティ
- **60分バンド**:実線(線幅4)- 中期ボラティリティ
- **動的幅**:高ボラティリティで拡大、低ボラティリティで縮小
**使用方法:**
1. **15分BB表示**および/または**60分BB表示**を設定から有効にする
2. **スクイーズを監視**:バンドが縮小するとき(低ボラティリティ)
- しばしば重要な動きの前に発生
3. **拡大を監視**:バンドが広がるとき(高ボラティリティ)
- アクティブなトレンド市場を示す
4. **バンドでの価格**:
- 上限バンドで:潜在的なレジスタンス、買われ過ぎ
- 下限バンドで:潜在的なサポート、売られ過ぎ
5. **複数時間軸ビュー**:コンフルエンスのために15分と60分のバンドを比較
**最適な用途:**
- ボラティリティ評価
- ブレイクアウトトレーディング(スクイーズ)
- 反転トレーディング(バンドタッチ)
- マルチタイムフレーム確認
---
### 6. ステータステーブル
**機能説明:**
監視されているすべての時間軸のトレンド方向の包括的な概要を、単一の読みやすいテーブルで表示します。
**主な機能:**
- **4時間足行**:240分データ(EMA、一目均衡表、MKRステータス)
- **1時間足行**:60分データ
- **15分足行**:15分データ
- **5分足行**:5分データ
- **3分足行**:3分データ
- **1分足行**:1分データ
- **色分けセル**:
- 青色の背景:強気
- 赤色の背景:弱気
- 灰色の背景:中立
**使用方法:**
1. **テーブルを配置**:6つの位置から選択
- 左上、右上
- 左中央、右中央
- 左下、右下(デフォルト)
2. **テーブルサイズを調整**:小、標準(デフォルト)、または大
3. **列を読む**:
- **TF**:時間軸
- **ema**:EMAトレンド(EMA20 vs EMA50)
- **ich**:一目均衡表の雲の色
- **mkr**:MKRバンドステータス
4. **整列を探す**:
- 時間軸全体で青:強い強気トレンド
- 時間軸全体で赤:強い弱気トレンド
- 混合色:チョッピーまたは移行期の市場
5. **コンフルエンスに使用**:
- より整列した時間軸 = より強いシグナル
- 移行を探す(色の変化)
**最適な用途:**
- 素早い市場概要
- マルチタイムフレームコンフルエンスチェック
- トレンド強度の識別
- 時間軸間のダイバージェンスの発見
---
### 7. アラートシステム
**機能説明:**
トレンド転換とバンドクロスを含む主要なイベントに対するカスタマイズ可能なアラートを提供します。
**利用可能なアラート:**
1. **VWC UPシグナル**:トレンドが弱気から強気に転換したとき
2. **VWC DOWNシグナル**:トレンドが強気から弱気に転換したとき
3. **15分MKR上限バンドクロスオーバー**:価格が15分MKR上限バンドを上抜け
4. **15分MKR下限バンドクロスオーバー**:価格が15分MKR下限バンドを上抜け
5. **15分MKR上限バンドクロスアンダー**:価格が15分MKR上限バンドを下抜け
6. **15分MKR下限バンドクロスアンダー**:価格が15分MKR下限バンドを下抜け
7. **60分MKRバンドクロス**:1時間足用の上記と同じ(4つのアラート)
8. **60分MKRバンドタッチ**:60分上限または下限バンドへの任意のタッチ(2つのアラート)
9. **240分MKRバンドクロス**:4時間足用の15分と同じ(4つのアラート)
**使用方法:**
1. **アラートアイコンをクリック**:TradingViewツールバーで
2. **条件を選択**:アラートリストから選択
3. **アラートを設定**:
- 頻度:バー終値で1回(推奨)
- 有効期限:必要に応じて設定
- アラートアクション:ポップアップ、メール、Webhookなど
4. **メッセージをカスタマイズ**:デフォルトメッセージには価格レベルが含まれます
5. **アラートを作成**:「作成」をクリック
**アラートのベストプラクティス:**
- リペイントを避けるために「バー終値で1回」を使用
- 異なる時間軸用に複数のアラートを設定
- トレンド転換アラートとバンドクロスアラートを組み合わせる
- まずペーパートレーディングでアラートをテスト
- アラートのみに依存せず、常に視覚的に確認
**最適な用途:**
- チャートを見ずにリアルタイム監視
- トレンド変化を早期にキャッチ
- 反転機会の識別
- トレーディング中のマルチタスク
---
## ⚙️ トレーディングスタイル別の推奨設定
### スキャルピング(1-5分取引)
```
VWC:
- ベース長:20-30(より速い反応)
- ベースタイプ:EMA
- ボラティリティ方法:StDev
- 最小/最大乗数:0.6 / 1.5
TBOSI:
- 1分、3分、5分の時間軸に焦点
- 15分MKRバンドを有効化
- テーブル位置:右上
- 高速アラートを有効化(15分MKR)
```
### デイトレーディング(15分 - 4時間保有)
```
VWC:
- ベース長:38(デフォルト)
- ベースタイプ:ALMA
- ボラティリティ方法:MAD
- 最小/最大乗数:0.8 / 1.8
TBOSI:
- 15分、1時間、4時間の時間軸に焦点
- 15分と60分のボリンジャーバンドを有効化
- テーブル位置:左下
- 60分MKRアラートを有効化
```
### スイングトレーディング(日足チャート)
```
VWC:
- ベース長:50-75(よりスムーズなトレンド)
- ベースタイプ:ALMA
- ボラティリティ方法:MAD
- 最小/最大乗数:1.0 / 2.0
TBOSI:
- 4時間、日足の時間軸に焦点
- より長いEMA(200、400、800)を使用
- 一目均衡表を有効化
- 240分MKRアラートを有効化
```
---
## 📱 クイックスタートガイド
### ステップ1:チャートに追加
1. TradingViewのインジケーターで「Trend and Bands Visualizer」を検索
2. チャートに追加
3. **重要**:インジケーター設定で「Pin to right scale」を設定
### ステップ2:基本設定を構成
1. **コンポーネントを有効化**:VWCおよび/またはTBOSIをオンにする
2. **バー着色を有効化**:視覚的なトレンド識別のため
3. **ステータステーブルを有効化**:マルチタイムフレームビュー用
4. **テーブルを配置**:好みの場所を選択
### ステップ3:表示をカスタマイズ
1. **ラベルサイズを調整**:標準(デフォルト)または視認性のためにより大きく
2. **EMAラインを有効/無効化**:チャートの明瞭性に基づいて
3. **EMA塗りつぶしを有効化**:視覚的なトレンド強度のため
4. **ボリンジャーバンドを有効化**:ブレイクアウト戦略を使用する場合
### ステップ4:アラートを設定
1. VWCトレンド転換用のアラートを作成
2. 主要なMKRバンドクロス用のアラートを作成
3. 適切なアラートアクション(メール、ポップアップなど)を設定
### ステップ5:分析を開始
1. 即座のトレンドバイアスのためにバーの色を確認
2. トレンド転換ラベル(UP/DOWN)を探す
3. マルチタイムフレーム確認のためにステータステーブルで検証
4. 新しい機会のアラートを待つ
---
## 💡 トレーディング戦略と例
### 戦略1:マルチタイムフレーム確認付きトレンドフォロー
**セットアップ:**
- VWCが明確なトレンドを示す(単色のバー)
- ステータステーブルが3つ以上の時間軸の整列を示す(すべて青またはすべて赤)
- 価格がEMA構造を尊重(上昇トレンドではEMAの上、下降トレンドではEMAの下)
**エントリー:**
- VWCトレンド転換ラベル(UPまたはDOWN)を待つ
- ステータステーブルでマルチタイムフレームの整列を検証
- EMA20またはEMA50への押し目でエントリー
- 最近のスイングロー(ロングの場合)またはスイングハイ(ショートの場合)の下/上にストップを設定
**エグジット:**
- 反対のVWCトレンド転換ラベル
- 反転を伴うMKRバンドの極端なタッチ
- ターゲット:1:2または1:3のリスクリワード比
---
### 戦略2:MKRバンドによる平均回帰
**セットアップ:**
- 価格がMKRバンド(15分または60分)にタッチまたはクロス
- 反対の時間軸が強いトレンドを示さない(テーブルで混合色)
- 平均への回帰を探す
**エントリー:**
- 価格が平均に向かってMKRバンドを通過して戻る
- 確認バーを待つ
- バンドを超えてタイトなストップでエントリー
**エグジット:**
- 価格が反対のMKRバンドに到達
- 価格が移動平均クラスターに到達
- 固定利益ターゲットまたはトレーリングストップ
---
### 戦略3:ボリンジャーバンドによるブレイクアウトトレーディング
**セットアップ:**
- ボリンジャーバンドがスクイーズを示す(狭い幅)
- 価格がバンド近くで統合
- 出来高が減少
**エントリー:**
- 価格がボリンジャーバンドをブレイクアウト
- VWCがバーの色で方向を確認
- ステータステーブルが新たな整列を示す
- ブレイクアウトバーまたはプルバックでエントリー
**エグジット:**
- ボリンジャーバンドが極端な拡大を示す
- VWCトレンド転換シグナル
- 価格が反対側のボリンジャーバンドに到達
---
## ⚠️ 重要な注意事項と制限事項
### このインジケーターができること:
✅ マルチタイムフレームトレンド分析を提供
✅ 潜在的なトレンド変化を識別
✅ ボラティリティとモメンタム状況を表示
✅ 視覚的およびアラートベースの通知を提供
✅ マルチタイムフレームコンフルエンスを支援
### このインジケーターができないこと:
❌ 将来の価格動きを確実に予測
❌ 利益の出る取引を保証
❌ 適切なリスク管理に代わる
❌ すべての市場状況で等しくうまく機能
❌ プライスアクション分析の必要性を排除
### 最も有効な場合:
✅ 市場に明確なトレンドまたはレンジがある
✅ 十分な流動性が存在する
✅ 適切なリスク管理と組み合わせて使用
✅ 出来高分析と並行して使用
✅ トレーダーが基礎となる概念を理解している
### 効果が低い場合:
❌ 市場が非常にチョッピーな場合
❌ ニュースイベントが不規則な価格動きを引き起こす場合
❌ 流動性が非常に低い状況
❌ 唯一の意思決定ツールとして使用される場合
❌ 設定が資産特性に合わせて調整されていない場合
---
## 🎓 教育的価値
このインジケーターは、トレーダーが以下を学ぶための教育ツールとして設計されています:
- 複数の時間軸にわたるトレンドダイナミクスを理解する
- ボラティリティとその取引への影響について学ぶ
- マルチタイムフレーム分析を実践する
- 市場分析への体系的なアプローチを開発する
- タイミングとエントリー/エグジットの決定を改善する
**覚えておいてください**:完璧なインジケーターはありません。常にテクニカル分析をファンダメンタル分析、リスク管理、適切なポジションサイジングと組み合わせてください。
---
## 📊 技術仕様
- **Pine Scriptバージョン**:6
- **チャートタイプ**:オーバーレイインジケーター
- **計算**:リアルタイム、リペイントなし
- **セキュリティコール**:確定バーデータで適切に実装
- **最大ルックバック**:5000バー
- **パフォーマンス**:最小限の遅延のために最適化
- **互換性**:すべてのTradingViewプランで動作
- **時間軸**:すべての時間軸で動作(ティックから月足まで)
- **資産**:株式、FX、仮想通貨、先物、指数
---
## ⚠️ 免責事項
**重要 - 必ずお読みください**
このインジケーターは、**教育および情報提供のみを目的として**提供されています。これは金融アドバイス、投資アドバイス、取引アドバイス、または金融商品の売買の推奨ではありません。
**リスク警告:**
- 金融商品の取引には重大な損失リスクが伴います
- 過去の実績は将来の結果を示すものではありません
- 初期投資額のすべて、またはそれ以上を失う可能性があります
- 失っても許容できる資本のみで取引してください
- 取引システムやインジケーターは100%正確ではありません
**ユーザーの責任:**
- 取引決定については、あなた自身が単独で責任を負います
- 常に独自の調査と分析を行ってください
- 資格のある金融アドバイザーに相談してください
- 取引前にリスクを理解してください
- 常に適切なリスク管理を使用してください
**保証なし:**
- 利益や成功の保証はありません
- 正確性やパフォーマンスの保証はありません
- 結果はユーザー間で大きく異なる場合があります
- 市場状況は常に変化します
このインジケーターを使用することにより、あなたはこれらのリスクを理解し、取引決定について全責任を受け入れることを認めます。
---
## 📞 サポートとアップデート
- **アップデート**:バグ修正と改善は必要に応じてリリースされます
- **質問**:技術的な質問にはTradingViewのコメントを使用してください
- **フィードバック**:建設的なフィードバックを歓迎し、感謝します
---
## 📜 ライセンス
このインジケーターはクローズドソースで独自のものです。すべての権利を保有します。
---
**© 2025 rasukaru666. All Rights Reserved.**
## Closed Source - Publication Description
---
# ENGLISH EXPLANATION
## 📊 Trend and Bands Visualizer (TBV)
**A comprehensive multi-timeframe analysis tool combining volatility-based trend detection with advanced technical indicators for educational market analysis.**
---
## 🎯 COMPLETE FEATURE LIST
### VWC (Volatility Weighted Cloud) Component
- ✅ Adaptive volatility-based trend detection
- ✅ Dynamic ALMA/EMA calculation with smoothing
- ✅ Automatic bar coloring based on trend direction
- ✅ Adaptive bands that adjust to market volatility
- ✅ Trend switch detection with visual labels
- ✅ Customizable label positioning and sizing
- ✅ Real-time trend status monitoring
### TBOSI (Trend, Bands, and Signal Indicator) Component
- ✅ Multi-timeframe EMA analysis (7 EMAs: 7, 20, 50, 100, 200, 400, 800)
- ✅ EMA crossover detection and visualization
- ✅ Color-coded EMA fills showing trend strength
- ✅ Ichimoku Cloud integration for trend confirmation
- ✅ MKR (Mean Reversion Bands) across 6 timeframes (1m, 3m, 5m, 15m, 1H, 4H)
- ✅ Non-repainting multi-timeframe calculations
- ✅ Bollinger Bands for 15m and 60m timeframes
- ✅ Comprehensive status table showing all timeframes
### Visual Display Features
- ✅ Color-coded bar coloring (Purple=Bullish, Blue=Bearish)
- ✅ Trend switch labels (UP/DOWN) with automatic positioning
- ✅ Multi-timeframe status table with customizable position
- ✅ Transparent overlay design for clear price action visibility
- ✅ Adjustable colors and transparency levels
- ✅ Scalable label sizes for different screen resolutions
### Alert System
- ✅ VWC trend switch alerts (UP/DOWN)
- ✅ MKR band crossing alerts for 15m timeframe
- ✅ MKR band crossing alerts for 1H timeframe
- ✅ MKR band crossing alerts for 4H timeframe
- ✅ Customizable alert messages with price levels
- ✅ Non-repainting alert triggers
### Customization Options
- ✅ Over 30 adjustable input parameters
- ✅ Enable/disable VWC and TBOSI independently
- ✅ Adjustable EMA lengths for all 7 moving averages
- ✅ Customizable Ichimoku parameters (Tenkan, Kijun, Senkou)
- ✅ Adjustable MKR band sensitivity (lookback, deviation)
- ✅ Flexible table positioning (6 positions available)
- ✅ Customizable label anchor points and offsets
- ✅ Color customization for all visual elements
---
## 📖 FEATURES AND USAGE GUIDE
### 1. VWC (Volatility Weighted Cloud)
**What It Does:**
VWC analyzes price volatility and trend direction to provide adaptive trend signals. It uses either ALMA (Arnaud Legoux Moving Average) or EMA with volatility-based adjustments to identify trend changes.
**Key Features:**
- **Adaptive Volatility Calculation**: Automatically adjusts to changing market conditions using StDev or MAD (Median Absolute Deviation)
- **Dynamic Bands**: Upper and lower bands expand and contract based on volatility percentile ranking
- **Trend Detection**: Identifies trend changes when price crosses the adaptive bands
- **Bar Coloring**: Visual representation of current trend (Purple=Bullish, Blue=Bearish)
**How to Use:**
1. **Enable VWC** from the settings panel
2. **Adjust Basis Length** (default: 38) - Lower values = more responsive, Higher values = smoother trends
3. **Choose Basis Type**:
- ALMA: Better for smooth trends, less noise
- EMA: Faster response to price changes
4. **Set Volatility Method**:
- StDev: Standard statistical approach
- MAD: More robust to outliers
5. **Adjust Multipliers**: Control band width (Min: 0.8, Max: 1.8)
6. **Watch for Trend Switch Labels**: UP▲ (bullish) or DOWN▼ (bearish) signals
**Best For:**
- Identifying primary trend direction
- Finding potential trend reversal points
- Visual confirmation of market bias
- Entry timing in trending markets
---
### 2. TBOSI Multi-Timeframe EMA Analysis
**What It Does:**
Displays and analyzes 7 exponential moving averages across multiple timeframes to identify trend alignment and potential support/resistance zones.
**Key Features:**
- **7 EMAs Simultaneously**: EMA7, EMA20, EMA50, EMA100, EMA200, EMA400, EMA800
- **EMA Fills**: Color-coded areas between EMAs show trend strength
- Blue fill: Bullish alignment (shorter EMA above longer EMA)
- Orange fill: Bearish alignment (shorter EMA below longer EMA)
- **Multi-Timeframe View**: Each timeframe's EMA status shown in status table
**How to Use:**
1. **Enable TBOSI** and **Show EMA Lines** from settings
2. **Enable EMA Fills** to see trend strength visualization
3. **Customize EMA Lengths** if needed for your trading style
4. **Watch for EMA Crossovers**:
- EMA7 crossing EMA20: Short-term trend change
- EMA20 crossing EMA50: Medium-term trend change
- EMA50 crossing EMA200: Long-term trend change
5. **Check Status Table**: Verify multi-timeframe alignment
- Blue = Bullish (EMA20 > EMA50)
- Red = Bearish (EMA20 < EMA50)
**Best For:**
- Confirming trend direction across timeframes
- Identifying dynamic support/resistance levels
- Spotting trend exhaustion (EMA compression)
- Multi-timeframe confluence analysis
---
### 3. Ichimoku Cloud Integration
**What It Does:**
Displays Ichimoku Cloud with leading spans to provide additional trend confirmation and identify key support/resistance zones.
**Key Features:**
- **Leading Span A & B**: Forward-projected cloud shows future support/resistance
- **Cloud Color**: Green (bullish) or Red (bearish) based on span relationship
- **Displacement**: Shows future price bias
- **Multi-Timeframe**: Cloud status for all monitored timeframes
**How to Use:**
1. **Enable Ichimoku Cloud Display** from settings
2. **Adjust Parameters** if needed:
- Tenkan (Conversion Line): Default 9
- Kijun (Base Line): Default 26
- Senkou Span B: Default 52
- Displacement: Default 26
3. **Interpret the Cloud**:
- Price above cloud: Bullish bias
- Price below cloud: Bearish bias
- Price in cloud: Neutral/transition
- Thick cloud: Strong support/resistance
- Thin cloud: Weak support/resistance
4. **Check Status Table**: See cloud color (B/S/N) for each timeframe
**Best For:**
- Additional trend confirmation
- Identifying future support/resistance zones
- Spotting equilibrium areas (transition zones)
- Long-term trend analysis
---
### 4. MKR (Mean Reversion Bands)
**What It Does:**
MKR Bands are statistical bands that identify potential overextension points where price may revert to the mean. Calculated across 6 timeframes for comprehensive analysis.
**Key Features:**
- **6 Timeframes**: 1m, 3m, 5m, 15m, 1H, 4H
- **Non-Repainting**: Uses confirmed bar data only
- **Dynamic Bands**: Adjust based on selected kernel and bandwidth
- **Color-Coded**: Blue (price above mean), Red (price below mean)
- **Cross Detection**: Identifies when price crosses upper or lower bands
**How to Use:**
1. **Enable NRP (Non-Repaint) Display** from settings
2. **Adjust Bandwidth** (default: 8) - Controls band sensitivity
3. **Set Deviations** (default: 6) - Controls band width
4. **Select Kernel Type** for calculation method:
- Gaussian: Smooth, balanced
- Epanechnikov: More responsive
- Other options for specific characteristics
5. **Watch for Band Crosses**:
- Cross above upper band: Potential overbought
- Cross below lower band: Potential oversold
- Cross back through bands: Mean reversion signal
6. **Check Status Table**: MKR column shows B/S status
**Best For:**
- Identifying overextended price moves
- Mean reversion trading strategies
- Confluence with trend signals
- Risk management (avoid extremes)
---
### 5. Bollinger Bands (15m & 60m)
**What It Does:**
Displays Bollinger Bands from 15-minute and 60-minute timeframes to identify volatility and potential reversal zones.
**Key Features:**
- **15m Bands**: Dotted lines (linewidth 3) - Short-term volatility
- **60m Bands**: Solid lines (linewidth 4) - Medium-term volatility
- **Dynamic Width**: Expands in high volatility, contracts in low volatility
**How to Use:**
1. **Enable 15m BB Display** and/or **60m BB Display** from settings
2. **Watch for Squeeze**: When bands contract (low volatility)
- Often precedes significant moves
3. **Watch for Expansion**: When bands widen (high volatility)
- Indicates active trending market
4. **Price at Bands**:
- At upper band: Potential resistance, overbought
- At lower band: Potential support, oversold
5. **Multiple Timeframe View**: Compare 15m and 60m bands for confluence
**Best For:**
- Volatility assessment
- Breakout trading (squeezes)
- Reversal trading (band touches)
- Multi-timeframe confirmation
---
### 6. Status Table
**What It Does:**
Displays a comprehensive overview of trend direction across all monitored timeframes in a single, easy-to-read table.
**Key Features:**
- **4H Timeframe Row**: 240m data (EMA, Ichimoku, MKR status)
- **1H Timeframe Row**: 60m data
- **15m Timeframe Row**: 15m data
- **5m Timeframe Row**: 5m data
- **3m Timeframe Row**: 3m data
- **1m Timeframe Row**: 1m data
- **Color-Coded Cells**:
- Blue background: Bullish
- Red background: Bearish
- Gray background: Neutral
**How to Use:**
1. **Position the Table**: Choose from 6 positions
- Top Left, Top Right
- Middle Left, Middle Right
- Bottom Left, Bottom Right (default)
2. **Adjust Table Size**: Small, Normal (default), or Large
3. **Read the Columns**:
- **TF**: Timeframe
- **ema**: EMA trend (EMA20 vs EMA50)
- **ich**: Ichimoku Cloud color
- **mkr**: MKR band status
4. **Look for Alignment**:
- All blue across timeframes: Strong bullish trend
- All red across timeframes: Strong bearish trend
- Mixed colors: Choppy or transitional market
5. **Use for Confluence**:
- More aligned timeframes = stronger signal
- Look for transitions (colors changing)
**Best For:**
- Quick market overview
- Multi-timeframe confluence check
- Identifying trend strength
- Spotting divergences between timeframes
---
### 7. Alert System
**What It Does:**
Provides customizable alerts for key events including trend switches and band crossings.
**Available Alerts:**
1. **VWC UP Signal**: When trend switches from bearish to bullish
2. **VWC DOWN Signal**: When trend switches from bullish to bearish
3. **15m MKR Upper Band Cross Over**: Price crosses above 15m MKR upper band
4. **15m MKR Lower Band Cross Over**: Price crosses above 15m MKR lower band
5. **15m MKR Upper Band Cross Under**: Price crosses below 15m MKR upper band
6. **15m MKR Lower Band Cross Under**: Price crosses below 15m MKR lower band
7. **60m MKR Band Crosses**: Same as above for 1H timeframe (4 alerts)
8. **60m MKR Band Touch**: Any touch of 60m upper or lower band (2 alerts)
9. **240m MKR Band Crosses**: Same as 15m for 4H timeframe (4 alerts)
**How to Use:**
1. **Click Alert Icon** on TradingView toolbar
2. **Select Condition**: Choose from alert list
3. **Configure Alert**:
- Frequency: Once per bar close (recommended)
- Expiration: Set as needed
- Alert actions: Popup, Email, Webhook, etc.
4. **Customize Message**: Default messages include price levels
5. **Create Alert**: Click "Create"
**Alert Best Practices:**
- Use "Once Per Bar Close" to avoid repainting
- Set up multiple alerts for different timeframes
- Combine trend switch alerts with band cross alerts
- Test alerts in paper trading first
- Don't rely solely on alerts - always verify visually
**Best For:**
- Real-time monitoring without watching charts
- Catching trend changes early
- Identifying reversal opportunities
- Multi-tasking while trading
---
## ⚙️ RECOMMENDED SETTINGS BY TRADING STYLE
### Scalping (1-5 minute trades)
```
VWC:
- Basis Length: 20-30 (faster response)
- Basis Type: EMA
- Volatility Method: StDev
- Min/Max Multiplier: 0.6 / 1.5
TBOSI:
- Focus on 1m, 3m, 5m timeframes
- Enable 15m MKR bands
- Table position: Top Right
- Enable fast alerts (15m MKR)
```
### Day Trading (15m - 4H holds)
```
VWC:
- Basis Length: 38 (default)
- Basis Type: ALMA
- Volatility Method: MAD
- Min/Max Multiplier: 0.8 / 1.8
TBOSI:
- Focus on 15m, 1H, 4H timeframes
- Enable 15m and 60m Bollinger Bands
- Table position: Bottom Left
- Enable 60m MKR alerts
```
### Swing Trading (Daily charts)
```
VWC:
- Basis Length: 50-75 (smoother trends)
- Basis Type: ALMA
- Volatility Method: MAD
- Min/Max Multiplier: 1.0 / 2.0
TBOSI:
- Focus on 4H, Daily timeframes
- Use longer EMAs (200, 400, 800)
- Enable Ichimoku Cloud
- Enable 240m MKR alerts
```
---
## 📱 QUICK START GUIDE
### Step 1: Add to Chart
1. Search for "Trend and Bands Visualizer" in TradingView indicators
2. Add to your chart
3. **Important**: Set "Pin to right scale" in indicator settings
### Step 2: Configure Basic Settings
1. **Enable Components**: Turn on VWC and/or TBOSI
2. **Enable Bar Coloring**: For visual trend identification
3. **Enable Status Table**: For multi-timeframe view
4. **Position Table**: Choose your preferred location
### Step 3: Customize Display
1. **Adjust Label Size**: Normal (default) or larger for visibility
2. **Enable/Disable EMA Lines**: Based on chart clarity
3. **Enable EMA Fills**: For visual trend strength
4. **Enable Bollinger Bands**: If using breakout strategies
### Step 4: Set Up Alerts
1. Create alert for VWC trend switches
2. Create alerts for key MKR band crosses
3. Set appropriate alert actions (email, popup, etc.)
### Step 5: Start Analyzing
1. Check bar colors for immediate trend bias
2. Look for trend switch labels (UP/DOWN)
3. Verify with status table for multi-timeframe confirmation
4. Wait for alerts for new opportunities
---
## 💡 TRADING STRATEGIES & EXAMPLES
### Strategy 1: Trend Following with Multi-Timeframe Confirmation
**Setup:**
- VWC shows clear trend (solid bar colors)
- Status table shows 3+ timeframes aligned (all blue or all red)
- Price respects EMA structure (above EMAs in uptrend, below in downtrend)
**Entry:**
- Wait for VWC trend switch label (UP or DOWN)
- Verify multi-timeframe alignment in status table
- Enter on pullback to EMA20 or EMA50
- Set stop below recent swing low (for longs) or above swing high (for shorts)
**Exit:**
- Opposite VWC trend switch label
- MKR band extreme touch with reversal
- Target: 1:2 or 1:3 risk-reward ratio
---
### Strategy 2: Mean Reversion with MKR Bands
**Setup:**
- Price touches or crosses MKR band (15m or 60m)
- Opposite timeframes show no strong trend (mixed colors in table)
- Looking for reversion to mean
**Entry:**
- Price crosses back through MKR band toward mean
- Wait for confirmation bar
- Enter with tight stop beyond band
**Exit:**
- Price reaches opposite MKR band
- Price reaches moving average cluster
- Fixed profit target or trailing stop
---
### Strategy 3: Breakout Trading with Bollinger Bands
**Setup:**
- Bollinger Bands showing squeeze (narrow width)
- Price consolidating near bands
- Volume decreasing
**Entry:**
- Price breaks out of Bollinger Band
- VWC confirms direction with bar color
- Status table shows emerging alignment
- Enter on breakout bar or pullback
**Exit:**
- Bollinger Bands show extreme expansion
- VWC trend switch signal
- Price reaches Bollinger Band on opposite side
---
## ⚠️ IMPORTANT NOTES & LIMITATIONS
### What This Indicator Does:
✅ Provides multi-timeframe trend analysis
✅ Identifies potential trend changes
✅ Shows volatility and momentum conditions
✅ Offers visual and alert-based notifications
✅ Helps with multi-timeframe confluence
### What This Indicator Does NOT Do:
❌ Predict future price movements with certainty
❌ Guarantee profitable trades
❌ Replace proper risk management
❌ Work equally well in all market conditions
❌ Eliminate the need for price action analysis
### Best Used When:
✅ Markets have clear trends or ranges
✅ Sufficient liquidity exists
✅ Combined with proper risk management
✅ Used alongside volume analysis
✅ Trader understands the underlying concepts
### Less Effective When:
❌ Markets are extremely choppy
❌ News events cause irregular price action
❌ Very low liquidity conditions
❌ Used as sole decision-making tool
❌ Settings not adjusted for asset characteristics
---
## 🎓 EDUCATIONAL VALUE
This indicator is designed as an educational tool to help traders:
- Understand trend dynamics across multiple timeframes
- Learn about volatility and its impact on trading
- Practice multi-timeframe analysis
- Develop systematic approaches to market analysis
- Improve timing and entry/exit decisions
**Remember**: No indicator is perfect. Always combine technical analysis with fundamental analysis, risk management, and proper position sizing.
---
## 📊 TECHNICAL SPECIFICATIONS
- **Pine Script Version**: 6
- **Chart Type**: Overlay indicator
- **Calculations**: Real-time, non-repainting
- **Security Calls**: Properly implemented with confirmed bar data
- **Maximum Lookback**: 5000 bars
- **Performance**: Optimized for minimal lag
- **Compatibility**: Works on all TradingView plans
- **Timeframes**: Works on all timeframes (tick to monthly)
- **Assets**: Stocks, Forex, Crypto, Futures, Indices
---
## ⚠️ DISCLAIMER
**IMPORTANT - PLEASE READ**
This indicator is provided for **educational and informational purposes only**. It is not financial advice, investment advice, trading advice, or a recommendation to buy or sell any financial instrument.
**Risk Warning:**
- Trading financial instruments involves substantial risk of loss
- Past performance is not indicative of future results
- You may lose all or more than your initial investment
- Only trade with capital you can afford to lose
- No trading system or indicator is 100% accurate
**User Responsibility:**
- You are solely responsible for your trading decisions
- Always conduct your own research and analysis
- Consult with qualified financial advisors
- Understand the risks before trading
- Use proper risk management at all times
**No Guarantees:**
- No guarantee of profits or success
- No guarantee of accuracy or performance
- Results may vary significantly between users
- Market conditions constantly change
By using this indicator, you acknowledge that you understand these risks and accept full responsibility for your trading decisions.
---
## 📞 SUPPORT & UPDATES
- **Updates**: Bug fixes and improvements will be released as needed
- **Questions**: Use TradingView comments for technical questions
- **Feedback**: Constructive feedback is welcome and appreciated
---
## 📜 LICENSE
This indicator is closed source and proprietary. All rights reserved.
---
---
# 日本語版
## 📊 トレンド&バンド ビジュアライザー (TBV)
**ボラティリティベースのトレンド検出と高度なテクニカル指標を組み合わせた、包括的なマルチタイムフレーム分析ツール(教育用)**
---
## 🎯 全機能リスト
### VWC(ボラティリティ加重クラウド)コンポーネント
- ✅ 適応型ボラティリティベースのトレンド検出
- ✅ スムージング機能付き動的ALMA/EMA計算
- ✅ トレンド方向に基づく自動バー着色
- ✅ 市場のボラティリティに適応する動的バンド
- ✅ 視覚的ラベルによるトレンド転換検出
- ✅ カスタマイズ可能なラベル位置とサイズ
- ✅ リアルタイムトレンドステータス監視
### TBOSI(トレンド、バンド、シグナルインジケーター)コンポーネント
- ✅ マルチタイムフレームEMA分析(7本:7, 20, 50, 100, 200, 400, 800)
- ✅ EMAクロスオーバー検出と可視化
- ✅ トレンド強度を示す色分けEMA塗りつぶし
- ✅ トレンド確認のための一目均衡表統合
- ✅ 6つの時間軸(1分、3分、5分、15分、1時間、4時間)のMKR(平均回帰バンド)
- ✅ リペイントしないマルチタイムフレーム計算
- ✅ 15分と60分の時間軸用ボリンジャーバンド
- ✅ 全時間軸を表示する包括的ステータステーブル
### ビジュアル表示機能
- ✅ 色分けバー着色(紫=強気、青=弱気)
- ✅ 自動配置されるトレンド転換ラベル(UP/DOWN)
- ✅ カスタマイズ可能な位置のマルチタイムフレームステータステーブル
- ✅ 価格アクションが見やすい透明オーバーレイデザイン
- ✅ 調整可能な色と透明度レベル
- ✅ 異なる画面解像度用のスケーラブルなラベルサイズ
### アラートシステム
- ✅ VWCトレンド転換アラート(UP/DOWN)
- ✅ 15分足MKRバンドクロスアラート
- ✅ 1時間足MKRバンドクロスアラート
- ✅ 4時間足MKRバンドクロスアラート
- ✅ 価格レベルを含むカスタマイズ可能なアラートメッセージ
- ✅ リペイントしないアラートトリガー
### カスタマイズオプション
- ✅ 30以上の調整可能な入力パラメータ
- ✅ VWCとTBOSIを個別に有効/無効化
- ✅ 全7本の移動平均の調整可能な期間
- ✅ カスタマイズ可能な一目均衡表パラメータ(転換線、基準線、先行スパン)
- ✅ 調整可能なMKRバンド感度(ルックバック、偏差)
- ✅ 柔軟なテーブル配置(6つの位置が利用可能)
- ✅ カスタマイズ可能なラベルアンカーポイントとオフセット
- ✅ すべての視覚要素の色カスタマイズ
---
## 📖 機能と使用方法ガイド
### 1. VWC(ボラティリティ加重クラウド)
**機能説明:**
VWCは価格のボラティリティとトレンド方向を分析し、適応型トレンドシグナルを提供します。ALMA(Arnaud Legoux移動平均)またはEMAをボラティリティベースの調整と組み合わせて使用し、トレンドの変化を識別します。
**主な機能:**
- **適応型ボラティリティ計算**:StDevまたはMAD(中央絶対偏差)を使用して市場状況の変化に自動的に適応
- **動的バンド**:上限バンドと下限バンドがボラティリティパーセンタイルランキングに基づいて拡大・縮小
- **トレンド検出**:価格が適応バンドを交差したときにトレンド変化を識別
- **バー着色**:現在のトレンドの視覚的表現(紫=強気、青=弱気)
**使用方法:**
1. **VWCを有効化**:設定パネルから有効にする
2. **ベース長を調整**(デフォルト:38):低い値 = より敏感、高い値 = よりスムーズなトレンド
3. **ベースタイプを選択**:
- ALMA:スムーズなトレンドに適しており、ノイズが少ない
- EMA:価格変化への反応が速い
4. **ボラティリティ方法を設定**:
- StDev:標準的な統計アプローチ
- MAD:外れ値に対してより堅牢
5. **乗数を調整**:バンド幅を制御(最小:0.8、最大:1.8)
6. **トレンド転換ラベルを監視**:UP▲(強気)またはDOWN▼(弱気)シグナル
**最適な用途:**
- 主要なトレンド方向の特定
- 潜在的なトレンド反転ポイントの発見
- 市場バイアスの視覚的確認
- トレンド市場でのエントリータイミング
---
### 2. TBOSIマルチタイムフレームEMA分析
**機能説明:**
複数の時間軸にわたって7本の指数移動平均を表示・分析し、トレンドの整合性と潜在的なサポート/レジスタンスゾーンを識別します。
**主な機能:**
- **7本のEMAを同時表示**:EMA7、EMA20、EMA50、EMA100、EMA200、EMA400、EMA800
- **EMA塗りつぶし**:EMA間の色分けされたエリアがトレンド強度を示す
- 青色の塗りつぶし:強気の整列(短期EMAが長期EMAの上)
- オレンジ色の塗りつぶし:弱気の整列(短期EMAが長期EMAの下)
- **マルチタイムフレームビュー**:各時間軸のEMAステータスがステータステーブルに表示
**使用方法:**
1. **TBOSIを有効化**し、**EMAラインを表示**を設定から有効にする
2. **EMA塗りつぶしを有効化**してトレンド強度の可視化を表示
3. 必要に応じて**EMA期間をカスタマイズ**
4. **EMAクロスオーバーを監視**:
- EMA7がEMA20をクロス:短期トレンド変化
- EMA20がEMA50をクロス:中期トレンド変化
- EMA50がEMA200をクロス:長期トレンド変化
5. **ステータステーブルを確認**:マルチタイムフレームの整合性を検証
- 青 = 強気(EMA20 > EMA50)
- 赤 = 弱気(EMA20 < EMA50)
**最適な用途:**
- 時間軸を超えたトレンド方向の確認
- 動的なサポート/レジスタンスレベルの特定
- トレンド疲弊の発見(EMAの圧縮)
- マルチタイムフレームコンフルエンス分析
---
### 3. 一目均衡表統合
**機能説明:**
先行スパンを持つ一目均衡表を表示し、追加のトレンド確認と主要なサポート/レジスタンスゾーンを識別します。
**主な機能:**
- **先行スパンA & B**:将来のサポート/レジスタンスを示す前方投影された雲
- **雲の色**:スパンの関係に基づいて緑(強気)または赤(弱気)
- **変位**:将来の価格バイアスを示す
- **マルチタイムフレーム**:監視されているすべての時間軸の雲の状態
**使用方法:**
1. **一目均衡表の表示を有効化**:設定から有効にする
2. 必要に応じて**パラメータを調整**:
- 転換線:デフォルト 9
- 基準線:デフォルト 26
- 先行スパンB:デフォルト 52
- 変位:デフォルト 26
3. **雲を解釈**:
- 価格が雲の上:強気バイアス
- 価格が雲の下:弱気バイアス
- 価格が雲の中:中立/移行期
- 厚い雲:強いサポート/レジスタンス
- 薄い雲:弱いサポート/レジスタンス
4. **ステータステーブルを確認**:各時間軸の雲の色(B/S/N)を確認
**最適な用途:**
- 追加のトレンド確認
- 将来のサポート/レジスタンスゾーンの特定
- 均衡エリア(移行ゾーン)の発見
- 長期トレンド分析
---
### 4. MKR(平均回帰バンド)
**機能説明:**
MKRバンドは、価格が平均に回帰する可能性のある過剰延長ポイントを識別する統計的バンドです。包括的な分析のために6つの時間軸で計算されます。
**主な機能:**
- **6つの時間軸**:1分、3分、5分、15分、1時間、4時間
- **リペイントなし**:確定バーデータのみを使用
- **動的バンド**:選択されたカーネルとバンド幅に基づいて調整
- **色分け**:青(価格が平均より上)、赤(価格が平均より下)
- **クロス検出**:価格が上限または下限バンドをクロスしたときを識別
**使用方法:**
1. **NRP(リペイントなし)表示を有効化**:設定から有効にする
2. **バンド幅を調整**(デフォルト:8):バンドの感度を制御
3. **偏差を設定**(デフォルト:6):バンドの幅を制御
4. 計算方法の**カーネルタイプを選択**:
- ガウシアン:スムーズでバランスが良い
- エパネチニコフ:より反応的
- その他の特定の特性用オプション
5. **バンドクロスを監視**:
- 上限バンドの上にクロス:潜在的な買われ過ぎ
- 下限バンドの下にクロス:潜在的な売られ過ぎ
- バンドを通過して戻る:平均回帰シグナル
6. **ステータステーブルを確認**:MKR列がB/Sステータスを表示
**最適な用途:**
- 過剰延長された価格動きの識別
- 平均回帰トレーディング戦略
- トレンドシグナルとのコンフルエンス
- リスク管理(極端な状況を避ける)
---
### 5. ボリンジャーバンド(15分 & 60分)
**機能説明:**
15分足と60分足のボリンジャーバンドを表示し、ボラティリティと潜在的な反転ゾーンを識別します。
**主な機能:**
- **15分バンド**:点線(線幅3)- 短期ボラティリティ
- **60分バンド**:実線(線幅4)- 中期ボラティリティ
- **動的幅**:高ボラティリティで拡大、低ボラティリティで縮小
**使用方法:**
1. **15分BB表示**および/または**60分BB表示**を設定から有効にする
2. **スクイーズを監視**:バンドが縮小するとき(低ボラティリティ)
- しばしば重要な動きの前に発生
3. **拡大を監視**:バンドが広がるとき(高ボラティリティ)
- アクティブなトレンド市場を示す
4. **バンドでの価格**:
- 上限バンドで:潜在的なレジスタンス、買われ過ぎ
- 下限バンドで:潜在的なサポート、売られ過ぎ
5. **複数時間軸ビュー**:コンフルエンスのために15分と60分のバンドを比較
**最適な用途:**
- ボラティリティ評価
- ブレイクアウトトレーディング(スクイーズ)
- 反転トレーディング(バンドタッチ)
- マルチタイムフレーム確認
---
### 6. ステータステーブル
**機能説明:**
監視されているすべての時間軸のトレンド方向の包括的な概要を、単一の読みやすいテーブルで表示します。
**主な機能:**
- **4時間足行**:240分データ(EMA、一目均衡表、MKRステータス)
- **1時間足行**:60分データ
- **15分足行**:15分データ
- **5分足行**:5分データ
- **3分足行**:3分データ
- **1分足行**:1分データ
- **色分けセル**:
- 青色の背景:強気
- 赤色の背景:弱気
- 灰色の背景:中立
**使用方法:**
1. **テーブルを配置**:6つの位置から選択
- 左上、右上
- 左中央、右中央
- 左下、右下(デフォルト)
2. **テーブルサイズを調整**:小、標準(デフォルト)、または大
3. **列を読む**:
- **TF**:時間軸
- **ema**:EMAトレンド(EMA20 vs EMA50)
- **ich**:一目均衡表の雲の色
- **mkr**:MKRバンドステータス
4. **整列を探す**:
- 時間軸全体で青:強い強気トレンド
- 時間軸全体で赤:強い弱気トレンド
- 混合色:チョッピーまたは移行期の市場
5. **コンフルエンスに使用**:
- より整列した時間軸 = より強いシグナル
- 移行を探す(色の変化)
**最適な用途:**
- 素早い市場概要
- マルチタイムフレームコンフルエンスチェック
- トレンド強度の識別
- 時間軸間のダイバージェンスの発見
---
### 7. アラートシステム
**機能説明:**
トレンド転換とバンドクロスを含む主要なイベントに対するカスタマイズ可能なアラートを提供します。
**利用可能なアラート:**
1. **VWC UPシグナル**:トレンドが弱気から強気に転換したとき
2. **VWC DOWNシグナル**:トレンドが強気から弱気に転換したとき
3. **15分MKR上限バンドクロスオーバー**:価格が15分MKR上限バンドを上抜け
4. **15分MKR下限バンドクロスオーバー**:価格が15分MKR下限バンドを上抜け
5. **15分MKR上限バンドクロスアンダー**:価格が15分MKR上限バンドを下抜け
6. **15分MKR下限バンドクロスアンダー**:価格が15分MKR下限バンドを下抜け
7. **60分MKRバンドクロス**:1時間足用の上記と同じ(4つのアラート)
8. **60分MKRバンドタッチ**:60分上限または下限バンドへの任意のタッチ(2つのアラート)
9. **240分MKRバンドクロス**:4時間足用の15分と同じ(4つのアラート)
**使用方法:**
1. **アラートアイコンをクリック**:TradingViewツールバーで
2. **条件を選択**:アラートリストから選択
3. **アラートを設定**:
- 頻度:バー終値で1回(推奨)
- 有効期限:必要に応じて設定
- アラートアクション:ポップアップ、メール、Webhookなど
4. **メッセージをカスタマイズ**:デフォルトメッセージには価格レベルが含まれます
5. **アラートを作成**:「作成」をクリック
**アラートのベストプラクティス:**
- リペイントを避けるために「バー終値で1回」を使用
- 異なる時間軸用に複数のアラートを設定
- トレンド転換アラートとバンドクロスアラートを組み合わせる
- まずペーパートレーディングでアラートをテスト
- アラートのみに依存せず、常に視覚的に確認
**最適な用途:**
- チャートを見ずにリアルタイム監視
- トレンド変化を早期にキャッチ
- 反転機会の識別
- トレーディング中のマルチタスク
---
## ⚙️ トレーディングスタイル別の推奨設定
### スキャルピング(1-5分取引)
```
VWC:
- ベース長:20-30(より速い反応)
- ベースタイプ:EMA
- ボラティリティ方法:StDev
- 最小/最大乗数:0.6 / 1.5
TBOSI:
- 1分、3分、5分の時間軸に焦点
- 15分MKRバンドを有効化
- テーブル位置:右上
- 高速アラートを有効化(15分MKR)
```
### デイトレーディング(15分 - 4時間保有)
```
VWC:
- ベース長:38(デフォルト)
- ベースタイプ:ALMA
- ボラティリティ方法:MAD
- 最小/最大乗数:0.8 / 1.8
TBOSI:
- 15分、1時間、4時間の時間軸に焦点
- 15分と60分のボリンジャーバンドを有効化
- テーブル位置:左下
- 60分MKRアラートを有効化
```
### スイングトレーディング(日足チャート)
```
VWC:
- ベース長:50-75(よりスムーズなトレンド)
- ベースタイプ:ALMA
- ボラティリティ方法:MAD
- 最小/最大乗数:1.0 / 2.0
TBOSI:
- 4時間、日足の時間軸に焦点
- より長いEMA(200、400、800)を使用
- 一目均衡表を有効化
- 240分MKRアラートを有効化
```
---
## 📱 クイックスタートガイド
### ステップ1:チャートに追加
1. TradingViewのインジケーターで「Trend and Bands Visualizer」を検索
2. チャートに追加
3. **重要**:インジケーター設定で「Pin to right scale」を設定
### ステップ2:基本設定を構成
1. **コンポーネントを有効化**:VWCおよび/またはTBOSIをオンにする
2. **バー着色を有効化**:視覚的なトレンド識別のため
3. **ステータステーブルを有効化**:マルチタイムフレームビュー用
4. **テーブルを配置**:好みの場所を選択
### ステップ3:表示をカスタマイズ
1. **ラベルサイズを調整**:標準(デフォルト)または視認性のためにより大きく
2. **EMAラインを有効/無効化**:チャートの明瞭性に基づいて
3. **EMA塗りつぶしを有効化**:視覚的なトレンド強度のため
4. **ボリンジャーバンドを有効化**:ブレイクアウト戦略を使用する場合
### ステップ4:アラートを設定
1. VWCトレンド転換用のアラートを作成
2. 主要なMKRバンドクロス用のアラートを作成
3. 適切なアラートアクション(メール、ポップアップなど)を設定
### ステップ5:分析を開始
1. 即座のトレンドバイアスのためにバーの色を確認
2. トレンド転換ラベル(UP/DOWN)を探す
3. マルチタイムフレーム確認のためにステータステーブルで検証
4. 新しい機会のアラートを待つ
---
## 💡 トレーディング戦略と例
### 戦略1:マルチタイムフレーム確認付きトレンドフォロー
**セットアップ:**
- VWCが明確なトレンドを示す(単色のバー)
- ステータステーブルが3つ以上の時間軸の整列を示す(すべて青またはすべて赤)
- 価格がEMA構造を尊重(上昇トレンドではEMAの上、下降トレンドではEMAの下)
**エントリー:**
- VWCトレンド転換ラベル(UPまたはDOWN)を待つ
- ステータステーブルでマルチタイムフレームの整列を検証
- EMA20またはEMA50への押し目でエントリー
- 最近のスイングロー(ロングの場合)またはスイングハイ(ショートの場合)の下/上にストップを設定
**エグジット:**
- 反対のVWCトレンド転換ラベル
- 反転を伴うMKRバンドの極端なタッチ
- ターゲット:1:2または1:3のリスクリワード比
---
### 戦略2:MKRバンドによる平均回帰
**セットアップ:**
- 価格がMKRバンド(15分または60分)にタッチまたはクロス
- 反対の時間軸が強いトレンドを示さない(テーブルで混合色)
- 平均への回帰を探す
**エントリー:**
- 価格が平均に向かってMKRバンドを通過して戻る
- 確認バーを待つ
- バンドを超えてタイトなストップでエントリー
**エグジット:**
- 価格が反対のMKRバンドに到達
- 価格が移動平均クラスターに到達
- 固定利益ターゲットまたはトレーリングストップ
---
### 戦略3:ボリンジャーバンドによるブレイクアウトトレーディング
**セットアップ:**
- ボリンジャーバンドがスクイーズを示す(狭い幅)
- 価格がバンド近くで統合
- 出来高が減少
**エントリー:**
- 価格がボリンジャーバンドをブレイクアウト
- VWCがバーの色で方向を確認
- ステータステーブルが新たな整列を示す
- ブレイクアウトバーまたはプルバックでエントリー
**エグジット:**
- ボリンジャーバンドが極端な拡大を示す
- VWCトレンド転換シグナル
- 価格が反対側のボリンジャーバンドに到達
---
## ⚠️ 重要な注意事項と制限事項
### このインジケーターができること:
✅ マルチタイムフレームトレンド分析を提供
✅ 潜在的なトレンド変化を識別
✅ ボラティリティとモメンタム状況を表示
✅ 視覚的およびアラートベースの通知を提供
✅ マルチタイムフレームコンフルエンスを支援
### このインジケーターができないこと:
❌ 将来の価格動きを確実に予測
❌ 利益の出る取引を保証
❌ 適切なリスク管理に代わる
❌ すべての市場状況で等しくうまく機能
❌ プライスアクション分析の必要性を排除
### 最も有効な場合:
✅ 市場に明確なトレンドまたはレンジがある
✅ 十分な流動性が存在する
✅ 適切なリスク管理と組み合わせて使用
✅ 出来高分析と並行して使用
✅ トレーダーが基礎となる概念を理解している
### 効果が低い場合:
❌ 市場が非常にチョッピーな場合
❌ ニュースイベントが不規則な価格動きを引き起こす場合
❌ 流動性が非常に低い状況
❌ 唯一の意思決定ツールとして使用される場合
❌ 設定が資産特性に合わせて調整されていない場合
---
## 🎓 教育的価値
このインジケーターは、トレーダーが以下を学ぶための教育ツールとして設計されています:
- 複数の時間軸にわたるトレンドダイナミクスを理解する
- ボラティリティとその取引への影響について学ぶ
- マルチタイムフレーム分析を実践する
- 市場分析への体系的なアプローチを開発する
- タイミングとエントリー/エグジットの決定を改善する
**覚えておいてください**:完璧なインジケーターはありません。常にテクニカル分析をファンダメンタル分析、リスク管理、適切なポジションサイジングと組み合わせてください。
---
## 📊 技術仕様
- **Pine Scriptバージョン**:6
- **チャートタイプ**:オーバーレイインジケーター
- **計算**:リアルタイム、リペイントなし
- **セキュリティコール**:確定バーデータで適切に実装
- **最大ルックバック**:5000バー
- **パフォーマンス**:最小限の遅延のために最適化
- **互換性**:すべてのTradingViewプランで動作
- **時間軸**:すべての時間軸で動作(ティックから月足まで)
- **資産**:株式、FX、仮想通貨、先物、指数
---
## ⚠️ 免責事項
**重要 - 必ずお読みください**
このインジケーターは、**教育および情報提供のみを目的として**提供されています。これは金融アドバイス、投資アドバイス、取引アドバイス、または金融商品の売買の推奨ではありません。
**リスク警告:**
- 金融商品の取引には重大な損失リスクが伴います
- 過去の実績は将来の結果を示すものではありません
- 初期投資額のすべて、またはそれ以上を失う可能性があります
- 失っても許容できる資本のみで取引してください
- 取引システムやインジケーターは100%正確ではありません
**ユーザーの責任:**
- 取引決定については、あなた自身が単独で責任を負います
- 常に独自の調査と分析を行ってください
- 資格のある金融アドバイザーに相談してください
- 取引前にリスクを理解してください
- 常に適切なリスク管理を使用してください
**保証なし:**
- 利益や成功の保証はありません
- 正確性やパフォーマンスの保証はありません
- 結果はユーザー間で大きく異なる場合があります
- 市場状況は常に変化します
このインジケーターを使用することにより、あなたはこれらのリスクを理解し、取引決定について全責任を受け入れることを認めます。
---
## 📞 サポートとアップデート
- **アップデート**:バグ修正と改善は必要に応じてリリースされます
- **質問**:技術的な質問にはTradingViewのコメントを使用してください
- **フィードバック**:建設的なフィードバックを歓迎し、感謝します
---
## 📜 ライセンス
このインジケーターはクローズドソースで独自のものです。すべての権利を保有します。
---
**© 2025 rasukaru666. All Rights Reserved.**
Phát hành các Ghi chú
Updated Basic Length of VMC from 38 to 12.Phát hành các Ghi chú
Added VWC trend info (B/S) in the MTF table.Mã được bảo vệ
Tập lệnh này được đăng dưới dạng mã nguồn đóng. Tuy nhiên, bạn có thể tự do sử dụng tập lệnh mà không có bất kỳ hạn chế nào – tìm hiểu thêm tại đây.
Thông báo miễn trừ trách nhiệm
Thông tin và ấn phẩm không có nghĩa là và không cấu thành, tài chính, đầu tư, kinh doanh, hoặc các loại lời khuyên hoặc khuyến nghị khác được cung cấp hoặc xác nhận bởi TradingView. Đọc thêm trong Điều khoản sử dụng.
Mã được bảo vệ
Tập lệnh này được đăng dưới dạng mã nguồn đóng. Tuy nhiên, bạn có thể tự do sử dụng tập lệnh mà không có bất kỳ hạn chế nào – tìm hiểu thêm tại đây.
Thông báo miễn trừ trách nhiệm
Thông tin và ấn phẩm không có nghĩa là và không cấu thành, tài chính, đầu tư, kinh doanh, hoặc các loại lời khuyên hoặc khuyến nghị khác được cung cấp hoặc xác nhận bởi TradingView. Đọc thêm trong Điều khoản sử dụng.